Plump Turkey Gnome Crochet Shelf Sitter Free Thanksgiving Pattern
Reader Favorites











Baby Dragon Crochet Amigurumi With Tiny Wings Free Crochet Pattern

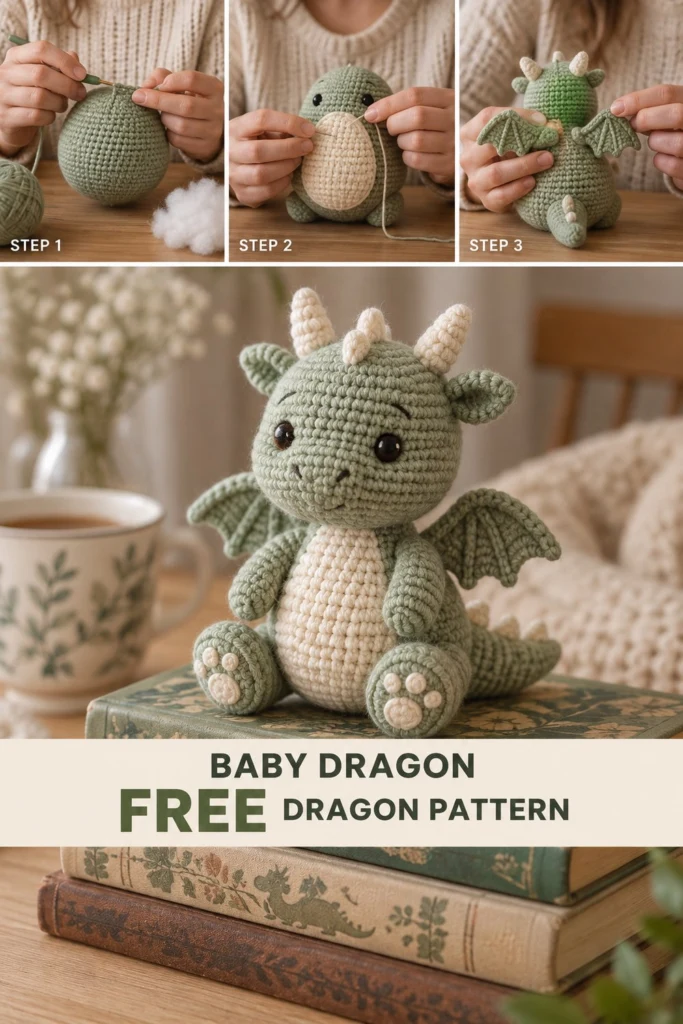
Welcome to your next favorite amigurumi project! This little dragon brings all the charm of a fantasy creature into a soft, huggable toy designed with safety and cuddliness in mind. With its textured sage body, contrasting cream belly, sweet embroidered face, and tiny stitched wings, it makes a wonderful companion for a little one or a charming guardian for a bookshelf.
Baby Dragon Crochet Amigurumi With Tiny Wings Free Crochet Pattern
Quick Facts
- Skill level: Intermediate
- Finished size: 7 inches tall sitting, 8 inches long from nose to tail tip
- Yarn: Worsted weight (Medium 4) cotton-blend yarn in Sage Green and Cream
- Hook: 3.5 mm (US E/4) crochet hook
- Stitches used: ch, sc, inc, dec, sl st, BLO, FLO
- Time to make: 5 to 7 hours
Size customization tips are included further down in this article.
What Makes This Baby Dragon Special
This dragon is worked primarily in continuous rounds of tight single crochet to ensure the polyester stuffing stays securely inside. The body and head are crocheted as one continuous piece from the bottom up, giving it a sturdy and seamless base. The cream belly patch and tiny wings are worked separately and securely whip-stitched into place. To make this toy safe for babies under three years old, all facial features are embroidered rather than using plastic safety eyes.
Skill Level
- Working in continuous spiral rounds (amigurumi method)
- Basic increasing and invisible decreases
- Color changes and basic surface embroidery
- Joining parts securely with whip stitches
Don’t worry if you are new to amigurumi—each step is clearly explained below!
Finished Measurements
- Height (Sitting): 7 inches / 18 cm
- Width (Shoulder to Shoulder): 5 inches / 13 cm
- Depth (Front to Tail): 8 inches / 20 cm
Materials You Will Need
| Material | Color | Amount / Weight |
|---|---|---|
| Main Yarn (Worsted Weight) | Sage Green | 180 yards / 165 meters |
| Contrast Yarn (Worsted Weight) | Cream | 50 yards / 46 meters |
| Horn & Spikes Yarn | Pale Cream | 30 yards / 27 meters |
| Embroidery Floss | Dark Brown & Black | Small amounts for eyes and nose |
| Crochet Hook | – | 3.5 mm (US E/4) |
| Notions | – | Polyester fiberfill stuffing, stitch markers, yarn needle, scissors |
Yarn Suggestions
| Yarn Line | Weight | Notes |
|---|---|---|
| Lion Brand 24/7 Cotton | Worsted (4) | Excellent stitch definition and durability for toys |
| Paintbox Yarns Cotton Aran | Worsted (4) | Great color range and smooth texture |
| Schachenmayr Catania Grande | Worsted (4) | Firm drape, perfect for amigurumi |
⚠️ Note: Avoid novelty yarns like eyelash or brushed acrylics for this pattern, as they obscure the stitch definition needed for amigurumi shaping and can shed fibers unsafe for young children.
Gauge
- Amigurumi Gauge: Rnds 1 to 6 of the flat circle = 2 inches (5 cm) across using a 3.5 mm hook. Getting exact gauge is less critical here than keeping your stitches tight so stuffing does not show through.
Abbreviations
- ch: chain
- sc: single crochet
- inc: increase (2 sc in the same stitch)
- dec: invisible decrease (sc 2 stitches together through front loops only)
- sl st: slip stitch
- BLO: back loop only
- FLO: front loop only
- st(s): stitch(es)
- Rnd(s): round(s)
- Row(s): row(s)
- sk: skip
- rep: repeat
UK conversion note: UK sc = US dc, UK hdc = US tr, UK dc = US dtr.
Special Stitches Explained
- Magic Ring: Wrap the yarn around your index finger twice to create a loop, insert hook into loop, pull up a loop, ch 1, and work the first round of stitches into the center of the ring. Pull the tail to close.
- Invisible Decrease (dec): Insert hook into the front loop of the first stitch, then immediately insert hook into the front loop of the second stitch. Yarn over and pull through both front loops, yarn over and pull through remaining 2 loops on hook.
Pattern Instructions
Pattern Notes: Work body and head in continuous spiral rounds without joining unless specified. Use a stitch marker to track the first stitch of each round.
Section 1: Body and Head (Sage Green, make 1)
Rnd 1: Start 6 sc in a magic ring (6 sc)
Rnd 2: inc x 6 (12 sc)
Rnd 3: (1 sc, inc) x 6 (18 sc)
Rnd 4: (2 sc, inc) x 6 (24 sc)
Rnd 5: (3 sc, inc) x 6 (30 sc)
Rnd 6: (4 sc, inc) x 6 (36 sc)
Rnd 7: (5 sc, inc) x 6 (42 sc)
Rnd 8: Working in BLO, sc in each st around (42 sc)
Rnds 9 to 15: sc in each st around (42 sc)
Rnd 16: (5 sc, dec) x 6 (36 sc)
Rnds 17 to 18: sc in each st around (36 sc)
Rnd 19: (4 sc, dec) x 6 (30 sc)
Rnds 20 to 21: sc in each st around (30 sc)
Rnd 22: (3 sc, dec) x 6 (24 sc)
Stuff the lower body firmly with fiberfill here.
Rnd 23: (2 sc, dec) x 6 (18 sc)
Rnd 24 (Head begins): (2 sc, inc) x 6 (24 sc)
Rnd 25: (3 sc, inc) x 6 (30 sc)
Rnd 26: (4 sc, inc) x 6 (36 sc)
Rnd 27: (5 sc, inc) x 6 (42 sc)
Rnds 28 to 34: sc in each st around (42 sc)
Rnd 35: (5 sc, dec) x 6 (36 sc)
Rnd 36: (4 sc, dec) x 6 (30 sc)
Rnd 37: (3 sc, dec) x 6 (24 sc)
Stuff the head firmly.
Rnd 38: (2 sc, dec) x 6 (18 sc)
Rnd 39: (1 sc, dec) x 6 (12 sc)
Rnd 40: dec x 6 (6 sc)
Fasten off, leaving a long tail. Thread tail through front loops of Rnd 40 and pull tight to close. Weave in end.
✅ Checkpoint: You now have a solid, pear-shaped body and head piece standing flat on its base.
Section 2: Belly Patch (Cream, make 1)
Row 1: Ch 7, sc in 2nd ch from hook and across (6 sc, turn)
Row 2: Ch 1, inc, 4 sc, inc (8 sc, turn)
Row 3: Ch 1, sc across (8 sc, turn)
Rows 4 to 12: Rep Row 3 (8 sc, turn)
Row 13: Ch 1, dec, 4 sc, dec (6 sc, turn)
Row 14: Ch 1, dec, 2 sc, dec (4 sc, turn)
Fasten off, leaving a long tail for sewing.
Section 3: Arms (Sage Green, make 2)
Rnd 1: Start 6 sc in a magic ring (6 sc)
Rnd 2: inc x 6 (12 sc)
Rnds 3 to 6: sc in each st around (12 sc)
Rnd 7: (2 sc, dec) x 3 (9 sc)
Rnds 8 to 10: sc in each st around (9 sc)
Lightly stuff the lower half of the arm. Flatten opening and sc across both sides to close (4 sc). Fasten off, leaving a long tail.
Section 4: Legs and Feet (Sage Green, make 2)
Rnd 1: Start 6 sc in a magic ring (6 sc)
Rnd 2: inc x 6 (12 sc)
Rnd 3: (1 sc, inc) x 6 (18 sc)
Rnds 4 to 5: sc in each st around (18 sc)
Rnd 6: 4 sc, dec x 5, 4 sc (13 sc)
Rnds 7 to 9: sc in each st around (13 sc)
Stuff the foot firmly. Flatten opening and sc across both sides to close (6 sc). Fasten off, leaving a long tail. Embroider three small cream toe lines on each foot using leftover cream yarn.
Section 5: Wings (Sage Green, make 2)
Row 1: Ch 9, sc in 2nd ch from hook and across (8 sc, turn)
Row 2: Ch 1, dec, 4 sc, dec (6 sc, turn)
Row 3: Ch 1, sc across (6 sc, turn)
Row 4: Ch 1, dec, 2 sc, dec (4 sc, turn)
Row 5: Ch 1, sc across (4 sc, turn)
Edge: Without fastening off, work 1 sc along the raw side edges, and work small scallop points along the outer edge (ch 2, sl st in first ch, skip 1 st) 3 times. Fasten off, leaving a long tail.
Section 6: Horns and Head Spikes (Pale Cream)
- Large Horn (make 2): Start 4 sc in magic ring; inc in each st (8 sc); Rnds 3 to 4: sc around (8 sc). Fasten off.
- Small Horn / Spike (make 3): Start 4 sc in magic ring; Rnd 2: (1 sc, inc) x 2 (6 sc); Rnd 3: sc around (6 sc). Fasten off.
Assembly
- Belly Patch: Center the cream belly patch onto the front of the body between Rnds 9 and 21. Whip-stitch securely around all edges.
- Legs: Attach the flattened tops of the legs to the lower sides of the body at Rnds 8 to 11, angling them slightly forward so the dragon sits upright.
- Arms: Sew the arms to the upper body just below the neck join at Rnds 22 and 23.
- Wings: Position the wings on the upper back between Rnds 26 and 30, spaced about 4 stitches apart. Sew along the straight edge of each wing.
- Horns and Spikes: Sew the two large horns to the top of the head at Rnds 33 to 35. Line up the three smaller spikes down the back of the head and upper tail.
- Facial Embroidery: Using dark brown embroidery floss, stitch sleepy oval eyes between Rnds 28 and 30, spaced 6 stitches apart. Add two small vertical stitches for nostrils on the snout.
Size Customization Tips
- To make a larger plush dragon, switch to a bulky weight chenille yarn and a 5.0 mm hook. Each additional increase round on the body adds approximately 1.5 inches to the total diameter.
- To make a miniature keychain version, use sport weight cotton yarn and a 2.5 mm hook.
Care Instructions
Hand wash gently in cool water with mild wool detergent. Do not bleach. Lay flat in the shade to dry. Do not tumble dry.
FAQ
Can I use safety eyes instead of embroidery?
Yes, you can use 9mm plastic safety eyes if this toy is intended for children over three years old or for display purposes only. For infants and toddlers, always use embroidered eyes to prevent choking hazards.
How do I keep my amigurumi stitches from showing gaps?
Make sure you are using a hook size 0.5 mm to 1 mm smaller than recommended on your yarn label. Keep your working tension snug and consistently pull your yarn slightly tighter on the working loop.
Can I change the main body color?
Of course! This pattern works wonderfully in lavender, sky blue, or mint green. Just make sure all main body pieces use the same dye lot.
Happy Crocheting!
I hope you love bringing this little dragon to life! Save this pin on Pinterest to keep the pattern handy, and leave a comment below telling me what color combination you chose for your baby dragon.
📄 Your free PDF pattern
⏳ Preparing your free PDF… 30s
Like this one? Save it for later.