Plump Turkey Gnome Crochet Shelf Sitter Free Thanksgiving Pattern
Reader Favorites











Little Orange Capybara Crochet Amigurumi Free Crochet Pattern

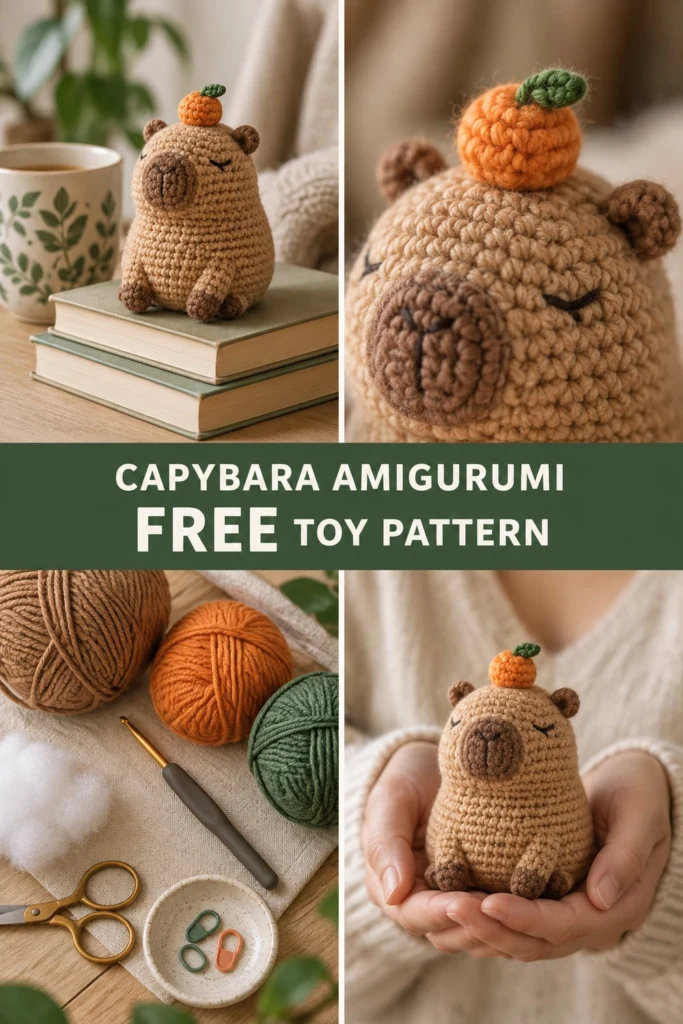
Meet the most unbothered little creature in the crochet world, resting peacefully with a tiny orange balanced on its head. This calm companion is crocheted in one continuous egg-shaped body with embroidered sleepy eyes, making it completely baby-safe and delightfully quick to stitch up. It makes a wonderful desk buddy or a charming handmade gift for anyone who loves gentle forest friends.
Little Orange Capybara Crochet Amigurumi Free Crochet Pattern
Quick Facts
- Skill level: Intermediate
- Finished size: 5 inches (13 cm) tall and 3.5 inches (9 cm) wide
- Yarn: Worsted weight yarn in Brown, Tan, Orange, and Green
- Hook: US C/2 (2.75 mm) crochet hook
- Stitches used: ch, sl st, sc, inc, dec, BLO
- Time to make: 4 to 6 hours
Size customization tips and gauge adjustments are included further down the page.
What Makes This Crochet Capybara Special
This pattern is designed for seamless amigurumi construction, meaning the body is worked in one piece from the base up without changing yarns for the main shape. The flat-bottom shaping is achieved using a Back Loop Only (BLO) round, which lets the capybara sit upright without tipping over. The ears and tiny orange are worked separately and sewn securely in place, while the sleepy facial features are stitched by hand so there are no hard plastic parts.
Skill Level
- Working in continuous spiral rounds (amigurumi style)
- Basic increases and invisible decreases
- Simple surface embroidery and yarn sewing
- Reassurance line: If you can make a magic ring and single crochet, you have all the skills you need for this project!
Finished Measurements
| Dimension | Inches | Centimeters |
|---|---|---|
| Height (with orange) | 5.0 | 13.0 |
| Width (at widest base) | 3.5 | 9.0 |
| Length (front to back) | 4.0 | 10.0 |
Materials You Will Need
| Material | Color | Details / Brand | Yards | Meters |
|---|---|---|---|---|
| Main Yarn | Tan | Worsted weight (acrylic/cotton blend) | 65 | 60 |
| Snout Yarn | Brown | Worsted weight | 15 | 14 |
| Fruit Yarn | Orange | Worsted weight | 10 | 9 |
| Leaf Yarn | Green | Worsted weight | 5 | 5 |
| Crochet Hook | – | US C/2 (2.75 mm) | – | – |
| Notions | – | Polyester fiberfill stuffing | – | – |
| Notions | – | Yarn needle, stitch marker, scissors | – | – |
| Embroidery | Black | Embroidery floss or scrap yarn for eyes/nose | – | – |
Yarn Suggestions
| Yarn Line | Weight | Skein Yardage | Notes |
|---|---|---|---|
| Lion Brand Vanna’s Choice | Worsted | 170 yds / 156 m | Holds shape well for amigurumi |
| Caron Simply Soft | Worsted | 315 yds / 288 m | Creates a smooth stitch definition |
| Paintbox Yarns Cotton Aran | Aran / Worsted | 93 yds / 85 m | Excellent stitch clarity and firm texture |
⚠️ Note: Avoid novelty, eyelash, or super-fuzzy yarns for this pattern. They hide the continuous single crochet stitches and make it difficult to shape the facial features and snout cleanly.
Gauge
- 16 sts x 18 rows = 4 inches (10 cm) in single crochet
- Rnds 1 to 6 of the flat body circle = 1.75 inches (4.5 cm) across
Abbreviations
- ch: chain
- sl st: slip stitch
- sc: single crochet
- inc: single crochet increase (work 2 sc in the same st)
- dec: invisible single crochet decrease (insert hook into front loops of next 2 sts, yarn over, pull through both loops, yarn over, pull through remaining 2 loops)
- BLO: back loop only
- st(s): stitch(es)
- Rnd(s): round(s)
UK: sc = dc, hdc = htr, dc = tr.
Special Stitches Explained
- Magic Ring: Wrap yarn around your index finger twice to create a ring, insert hook through center, yarn over, pull up a loop, and work your starting stitches into the ring. Pull the tail to close.
- Invisible Decrease (dec): Insert the hook under the front loop only of the first stitch, then immediately insert the hook under the front loop only of the second stitch. Yarn over and pull through both front loops, then yarn over and pull through the remaining two loops on the hook.
Pattern Instructions
Pattern Notes: The body and snout are worked in continuous spiral rounds without joining. Do not slip stitch at the end of each round unless instructed. Use a stitch marker to keep track of the first stitch of every round.
Section 1: Body (Tan, make 1)
Rnd 1: Work 6 sc in a magic ring (6 sc)
Rnd 2: Inc in each st around (12 sc)
Rnd 3: (1 sc, inc) x 6 (18 sc)
Rnd 4: (2 sc, inc) x 6 (24 sc)
Rnd 5: (3 sc, inc) x 6 (30 sc)
Rnd 6: (4 sc, inc) x 6 (36 sc)
Rnd 7: (5 sc, inc) x 6 (42 sc)
Rnd 8: Working in BLO, sc in each st around (42 sc)
Rnds 9 to 18: Sc in each st around (42 sc)
Rnd 19: (5 sc, dec) x 6 (36 sc)
Rnds 20 to 22: Sc in each st around (36 sc)
Rnd 23: (4 sc, dec) x 6 (30 sc)
Rnd 24: Sc in each st around (30 sc)
Rnd 25: (3 sc, dec) x 6 (24 sc)
Start stuffing the body firmly with fiberfill, shaping the flat base at the BLO round so it sits upright.
Rnd 26: (2 sc, dec) x 6 (18 sc)
Rnd 27: (1 sc, dec) x 6 (12 sc)
Finish stuffing completely.
Rnd 28: Dec x 6 (6 sc)
Fasten off, leaving a 6-inch tail. Weave the tail through the front loops of the remaining 6 stitches and pull tight to close the top opening. Hide the yarn end inside the body.
Section 2: Snout (Brown, make 1)
Rnd 1: Work 6 sc in a magic ring (6 sc)
Rnd 2: Inc in each st around (12 sc)
Rnd 3: (1 sc, inc) x 6 (18 sc)
Rnd 4: Sc in each st around (18 sc)
Fasten off, leaving a 10-inch tail for sewing. Lightly stuff the snout.
Section 3: Ears (Tan, make 2)
Rnd 1: Work 5 sc in a magic ring (5 sc)
Rnd 2: Inc in each st around (10 sc)
Rnd 3: Sc in each st around (10 sc)
Fasten off, leaving an 8-inch tail for sewing. Do not stuff the ears; flatten them slightly before attaching.
Section 4: Orange Fruit (Orange, make 1)
Rnd 1: Work 6 sc in a magic ring (6 sc)
Rnd 2: Inc in each st around (12 sc)
Rnd 3: (1 sc, inc) x 6 (18 sc)
Rnds 4 to 5: Sc in each st around (18 sc)
Rnd 6: (1 sc, dec) x 6 (12 sc)
Stuff lightly with fiberfill.
Rnd 7: Dec x 6 (6 sc)
Fasten off, leaving an 8-inch tail to sew the orange to the top of the head.
Section 5: Leaf (Green, make 1)
Row 1: Ch 4, working in 2nd ch from hook: sl st, hdc in next ch, sl st in last ch (3 sts)
Fasten off, leaving a 6-inch tail. Sew the leaf securely to the top of the orange.
✅ Checkpoint: You should now have one stuffed body, one snout, two ears, one orange fruit with its leaf attached, and all yarn tails secured or ready for assembly.
Assembly
- Snout Placement: Position the brown snout centrally on the lower front of the body, spanning between Rnds 10 and 16. Sew around the edges using the yarn tail, adding a tiny bit more stuffing just before closing the seam.
- Ear Placement: Flatten the ears and sew them symmetrically to the upper sides of the head between Rnds 22 and 25, about 6 stitches apart from the center crown.
- Orange Placement: Sew the orange firmly to the very top center of the capybara’s head (covering Rnds 27 to 28 of the body).
- Facial Embroidery: Using black embroidery floss, stitch two small, downward-curved sleeping eyes (horizontal dashes with tiny upward flicks at the outer edges) on the upper face just above the snout, about 4 stitches apart. Add a small vertical line and inverted triangle on the snout for the nose and mouth.
Finishing
Weave in all remaining yarn ends securely inside the body. Check that the capybara sits evenly on its flat base. No blocking is required for amigurumi projects.
Size Customization Tips
- To make a larger capybara, use bulky weight yarn with a US J/10 (6.0 mm) hook and continue the increase rounds up to (6 sc, inc) x 6 (48 sc), adding extra straight rounds before decreasing.
- Each additional increase round adds approximately 0.75 inches to the base diameter.
Care Instructions
Spot clean gently with a damp cloth and mild soap. Do not submerge in water or machine wash, as this may distort the fiberfill stuffing and shape. Air dry away from direct heat.
FAQ
Can I use safety eyes instead of embroidery?
Yes, but embroidered sleepy eyes are strongly recommended if this toy is intended for babies or toddlers under 3 years old to prevent any choking hazards.
What is the best way to stuff amigurumi evenly?
Add small pinches of fiberfill at a time, pushing the stuffing into the corners and edges using the back of your crochet hook or chopsticks to prevent lumps.
How do I keep my continuous rounds from shifting?
Always use a stitch marker in the very first stitch of every round and move it up as you complete each new round.
Happy Crocheting!
I hope you love bringing your little unbothered capybara to life! Be sure to save this pin on Pinterest so you can find it later, and leave a comment below to share what colors you used for your sweet forest friend. Happy crocheting!
📄 Your free PDF pattern
⏳ Preparing your free PDF… 30s
Like this one? Save it for later.