Plump Turkey Gnome Crochet Shelf Sitter Free Thanksgiving Pattern
Reader Favorites











Tiny Potted Tulip Crochet Desk Plant Free Crochet Pattern

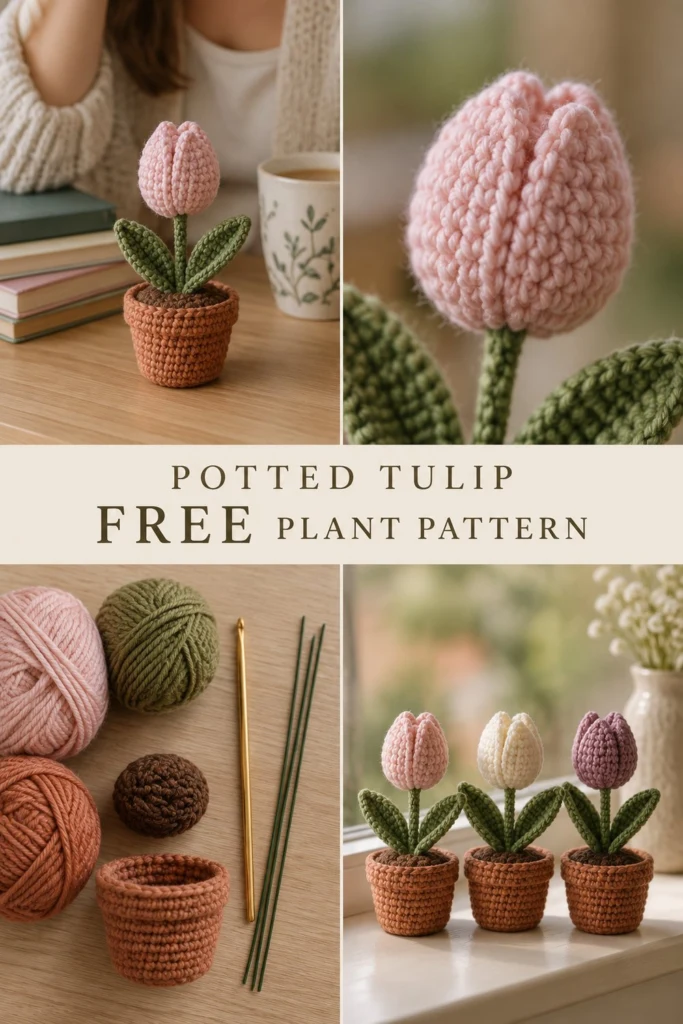
This charming little amigurumi tulip desk plant is the ultimate houseplant for anyone without a green thumb—it never needs watering, won’t wilt in the sun, and stays in perpetual spring bloom. Worked in continuous rounds of soft cotton yarn with a sturdy wired stem, this sweet handmade project sits proudly in its own textured terracotta-colored pot filled with rich brown soil. Make a cheerful trio in blush, cream, and lavender to brighten up your desk, windowsill, or a friend’s workspace!
Tiny Potted Tulip Crochet Desk Plant Free Crochet Pattern
Quick Facts
- Skill level: Intermediate
- Finished size: Approximately 3.5 inches (9 cm) tall and 2 inches (5 cm) wide at the pot base
- Yarn: Worsted-weight cotton yarn in Blush Pink, Olive Green, Terracotta, and Dark Brown
- Hook: US E/4 (3.5 mm) crochet hook
- Stitches used: US terminology (ch, sc, hdc, dc, sl st, inc, dec, BLO, FLO)
- Time to make: 2 to 3 hours
Size tips and customization options are included further down in the guide.
What Makes This Tiny Potted Tulip Special
Every element of this pattern is designed to mimic a real potted plant while remaining durable and self-supporting. The tulip bud uses tight single crochet stitches worked in continuous spirals to form a closed, textured cup that holds its shape. A hidden floral wire threaded through the stem keeps the blossom standing tall and proud, while the terracotta pot features a defined base round and a folded rim created by working through back loops, giving it a crisp, realistic edge. The soil is tightly stuffed to anchor the stem securely inside the pot without sagging.
Skill Level
- Working in the round (spiral) and flat rows
- Basic amigurumi increases and decreases (sc2tog)
- Working into Back Loops Only (BLO) and Front Loops Only (FLO)
- Inserting wire and basic floral assembly
If you are comfortable with basic amigurumi shaping and joining pieces with a yarn needle, you will breeze right through this project!
Finished Measurements
- Pot Diameter: 2 inches (5 cm)
- Pot Height: 1.75 inches (4.5 cm)
- Total Height (Pot to Tulip Tip): 3.5 inches (9 cm)
- Leaf Length: 2 inches (5 cm)
Materials You Will Need
| Material | Color Name | Yarn Weight / Type | Quantity |
|---|---|---|---|
| Yarn A | Blush Pink | Worsted / 100% Cotton | 15 yards (14 meters) |
| Yarn B | Olive Green | Worsted / 100% Cotton | 20 yards (18 meters) |
| Yarn C | Terracotta | Worsted / 100% Cotton | 25 yards (23 meters) |
| Yarn D | Dark Brown | Worsted / 100% Cotton | 10 yards (9 meters) |
| Hook | — | US E/4 (3.5 mm) crochet hook | 1 hook |
| Notions | — | Polyester fiberfill stuffing | 1 small handful |
| Notions | — | Floral wire (16-gauge, approx. 6 inches) | 1 piece |
| Notions | — | Stitch marker, tapestry needle, scissors | As needed |
Yarn Suggestions
| Yarn Line | Fiber | Notes |
|---|---|---|
| Lion Brand 24/7 Cotton | 100% Mercerized Cotton | Excellent stitch definition, holds shape well for amigurumi pots. |
| Drops Paris | 100% Combed Cotton | Soft matte finish, great color selection for natural flower tones. |
| Lily Sugar’n Cream | 100% Cotton | Readily available budget-friendly choice with sturdy structure. |
⚠️ Note: Avoid loosely spun single-ply yarns or fuzzy acrylics for this project. Cotton yarns provide the crisp stitch definition and stiff structure needed for the flower pot to stand upright and the tulip petals to hold their curved shape.
Gauge
- Amigurumi Gauge: Rnds 1 to 6 of the flat circle = 1.5 inches (3.8 cm) across using a 3.5 mm hook.
- Exact gauge is not critical for amigurumi, but keep your stitches tight and even so the stuffing does not show through.
Abbreviations
- approx: approximately
- BLO: back loop only
- ch: chain
- dc: double crochet
- dec: decrease (single crochet 2 together)
- FLO: front loop only
- hdc: half double crochet
- inc: increase (2 single crochet in the same stitch)
- Rnd(s): round(s)
- Row(s): row(s)
- sc: single crochet
- sl st: slip stitch
- st(s): stitch(es)
- [ ] / ( ): work instructions inside parentheses as many times as directed
UK Terms Translation: sc = dc, hdc = htr, dc = tr.
Special Stitches Explained
- Magic Ring: Form a loop with the working yarn, leaving a 6-inch tail. Insert hook into the center of the loop, yarn over, and pull up a loop. Chain 1 to secure, then work the first round of stitches directly into the center of the ring. Pull the tail tight to close the center hole.
- Invisible Decrease (inv-dec): Insert hook into the front loop only of the next stitch, then insert hook into the front loop only of the following stitch (3 loops on hook). Yarn over and pull through the first 2 loops, yarn over and pull through remaining 2 loops.
Pattern Instructions
Pattern Notes
- All amigurumi components (except leaves) are worked in continuous spiral rounds without joining unless specified. Use a stitch marker to track the first stitch of each round.
- Stuff amigurumi pieces firmly as you go unless otherwise directed.
Section 1: Tulip Bud (Blush Pink, Make 1)
Rnd 1: Start 6 sc in a magic ring (6 sc)
Rnd 2: [inc] x 6 (12 sc)
Rnd 3: [1 sc, inc] x 6 (18 sc)
Rnd 4: [2 sc, inc] x 6 (24 sc)
Rnds 5 to 10: sc in each st around (24 sc)
Rnd 11: [2 sc, dec] x 6 (18 sc)
Stuff the tulip bud lightly with fiberfill.
Rnd 12: [1 sc, dec] x 6 (12 sc)
Rnd 13: [dec] x 6 (6 sc)
Fasten off, leaving a 10-inch tail. Use a tapestry needle to weave the tail through the front loops of Rnd 13 and pull tight to close the opening. Weave in ends.
Section 2: Stem (Olive Green, Make 1)
Row 1: Ch 13, working in back bumps of chain, sl st in 2nd ch from hook and in each ch across (12 sl st)
Fasten off, leaving an 8-inch tail. Insert the 6-inch floral wire through the center of the stem stitches, bending the ends slightly to secure inside both the tulip bud and the soil base.
Section 3: Leaves (Olive Green, Make 2)
Row 1: Ch 11, sc in 2nd ch from hook, hdc in next 2 ch, dc in next 4 ch, hdc in next 2 ch, 3 sc in last ch. Working down the opposite side of the chain foundation: hdc in next 2 ch, dc in next 4 ch, hdc in next 2 ch, sc in last ch, sl st to first st to join (22 sts)
Fasten off, leaving a 6-inch tail for sewing.
Section 4: Soil Insert (Dark Brown, Make 1)
Rnd 1: Start 6 sc in a magic ring (6 sc)
Rnd 2: [inc] x 6 (12 sc)
Rnd 3: [1 sc, inc] x 6 (18 sc)
Rnd 4: [2 sc, inc] x 6 (24 sc)
Rnd 5: [3 sc, inc] x 6 (30 sc)
Fasten off, leaving a long 12-inch tail for sewing the soil into the pot.
Section 5: Terracotta Pot (Terracotta, Make 1)
Rnd 1: Start 6 sc in a magic ring (6 sc)
Rnd 2: [inc] x 6 (12 sc)
Rnd 3: [1 sc, inc] x 6 (18 sc)
Rnd 4: [2 sc, inc] x 6 (24 sc)
Rnd 5: [3 sc, inc] x 6 (30 sc)
Rnd 6: Working in BLO, sc in each st around (30 sc)
Rnds 7 to 13: Working in both loops, sc in each st around (30 sc)
Rnd 14: Working in FLO, [4 sc, inc] x 6 (36 sc)
Rnds 15 to 16: sc in each st around (36 sc)
Rnd 17: sl st in each st around (36 sl st)
Fasten off and weave in all ends. Fold Rnds 14–16 outward and downward over the outside of the pot to form the classic terracotta lip rim.
Assembly
- Prepare the Pot: Stuff the bottom of the terracotta pot firmly with fiberfill until it fills out the base shape.
- Insert Stem & Soil: Push the bottom end of the wired stem securely through the center of the Dark Brown Soil piece. Insert the soil piece into the top opening of the terracotta pot (just below the folded lip). Using the long brown yarn tail, whip-stitch the outer edge of the soil securely to Rnd 13 of the pot, stuffing a bit more fiberfill underneath if needed to create a slightly domed soil surface.
- Attach Leaves: Sew the two Olive Green leaves to opposite sides of the stem right above the soil surface, anchoring them securely through the soil stitches.
- Attach Tulip Bud: Press the top of the wired stem into the bottom of the Blush Pink Tulip bud, then use the remaining green yarn tail from the stem to securely stitch the base of the tulip to the top of the stem.
✅ Checkpoint: Ensure the floral wire is fully enclosed inside the stem and both ends are tucked securely into the tulip bud and pot base so no sharp wire points poke out.
Size Customization Tips
- To make a larger potted plant, start the pot with 8 sc in a magic ring and increase by 8 stitches per round instead of 6, adjusting the soil disc and tulip bud proportions accordingly.
- Use lightweight sport-weight yarn and a 2.75 mm hook to create an even tinier, delicate mini desk plant.
Care Instructions
Spot clean gently with a damp cloth and mild soap. Do not submerge in water due to the internal floral wire and fiberfill stuffing. Allow to air dry completely.
FAQ
Can I make this without floral wire?
Yes! If you prefer a floppy, whimsical tulip or are making this for a young child, you can omit the floral wire entirely. The tight cotton stitches will still hold the stem upright, though it may lean slightly to one side.
How do I change the color of the tulip?
You can easily swap out the Blush Pink yarn for vibrant yellow, deep purple, or classic red cotton in the exact same stitch counts to create a colorful windowsill garden.
Are safety eyes needed for this pattern?
No safety eyes are required for this decorative desk plant. If you choose to add a face to your tulip, use black embroidery floss to stitch a sweet, simple smile, keeping embroidery safe for crafters of all ages.
Happy Crocheting!
I hope you adore stitching your tiny potted tulip plant as much as I loved designing it! Be sure to save this pattern to your Pinterest crochet boards and leave a comment below sharing what colors you used for your blooming desk garden.
📄 Your free PDF pattern
⏳ Preparing your free PDF… 30s
Like this one? Save it for later.