Plump Turkey Gnome Crochet Shelf Sitter Free Thanksgiving Pattern
Reader Favorites











Gold Star Crochet Christmas Tree Topper Free Christmas Pattern

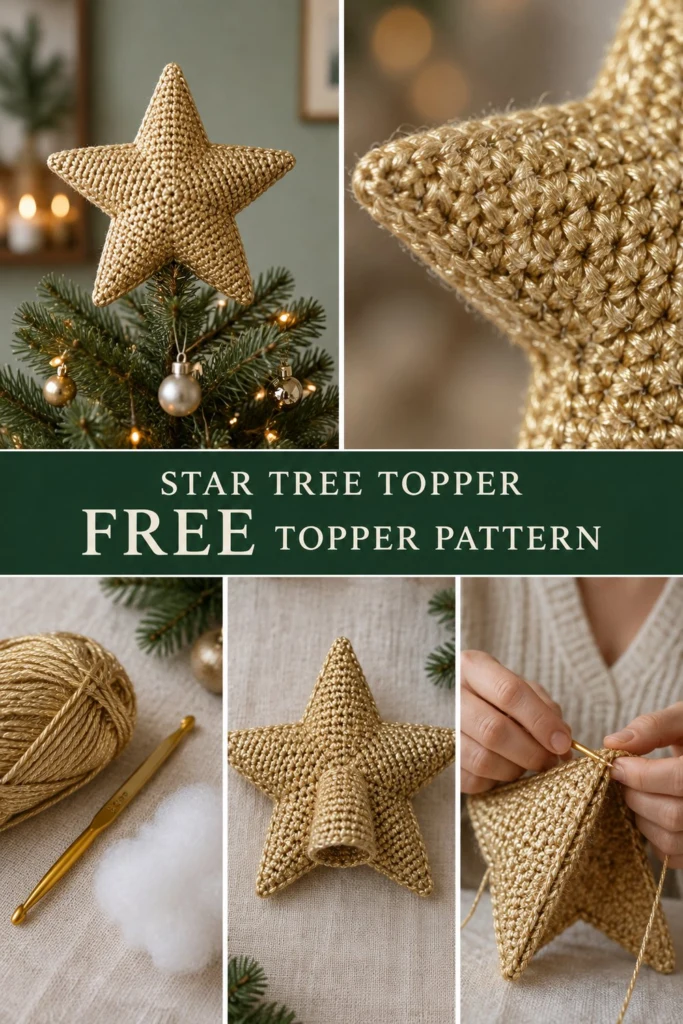
Forget the wobbly plastic star from the attic. This soft gold crochet Christmas tree topper is two panels of firm single crochet in shimmering gold yarn, stitched together and lightly stuffed, with a neat crochet cone at the back that slips securely over your top tree branch and stays put. It sits straight on real and artificial trees alike and packs flat for storage year after year.
Gold Star Crochet Christmas Tree Topper Free Christmas Pattern
Quick Facts
- Skill level: Intermediate
- Finished size: 9 inches (23 cm) across point-to-point; cone opening 1 inch (2.5 cm) wide
- Yarn: DK-weight metallic gold yarn, approx. 140 yards (128 meters)
- Hook: US D/3 (3.25 mm) crochet hook
- Stitches used: ch, sl st, sc, inc, dec (sc2tog), BLO
- Time to make: 4 to 6 hours
Size customization tips are included further down the page to help you adapt the topper to smaller tabletop trees or grand living room pines.
What Makes This Star Tree Topper Special
Working in continuous rounds for the back cone and firm rows for the two star panels gives this project a clean, professional finish. The tight single crochet stitches hide the light polyester stuffing inside, while the built-in mounting cone hugs the center branch so the star never lists to one side. The soft gold yarn catches the twinkle of fairy lights without looking harsh.
Skill Level
- Required skills: Working in continuous rounds, flat rows in single crochet, working into the back loops only (BLO), invisible decreases, basic sewing with a yarn needle.
- Reassurance line: If you can work a standard single crochet and follow simple increases and decreases, you are more than ready to tackle this tree topper!
Finished Measurements
| Measurement | Inches | Centimeters |
|---|---|---|
| Star Width (Point to Point) | 9.0 in | 23.0 cm |
| Star Thickness (Stuffed) | 1.5 in | 3.8 cm |
| Branch Cone Length | 2.5 in | 6.4 cm |
| Branch Cone Opening Diameter | 1.0 in | 2.5 cm |
Materials You Will Need
| Item | Description | Quantity / Amount |
|---|---|---|
| Yarn | DK-weight metallic gold yarn (color: Soft Gold) | 140 yards (128 meters) |
| Hook | US D/3 (3.25 mm) crochet hook | 1 hook |
| Notions | Polyester fiberfill stuffing | 1 small handful |
| Notions | Stitch markers | 2 markers |
| Notions | Yarn needle (tapestry needle) | 1 needle |
Yarn Suggestions
| Yarn Line | Skein Yardage | Notes |
|---|---|---|
| Scheepjes Catona Metallised | 137 yards / 50g | Gives brilliant shine with sturdy cotton core |
| Rico Design Essentials Cotton Metallic | 142 yards / 50g | Excellent stitch definition for firm amigurumi |
| DMC Natura Just Cotton Metallic | 155 yards / 50g | Soft handfeel, easy to work with tightly |
⚠️ Note: Avoid fuzzy mohair or loosely spun novelty yarns. You need a smooth, tightly plied metallic yarn so the individual single crochet stitches remain crisp and the stuffing does not peek through.
Gauge
- 22 sts x 24 rows = 4 inches (10 cm) in single crochet using a US D/3 (3.25 mm) hook.
- Rnds 1 to 6 of the star center = 2.0 inches (5 cm) across.
Abbreviations
- ch – chain
- sl st – slip stitch
- sc – single crochet
- inc – single crochet increase (work 2 sc in the same st)
- dec – single crochet decrease (sc2tog, insert hook in next st, yarn over, pull up a loop, insert hook in following st, yarn over, pull up a loop, yarn over, pull through all 3 loops on hook)
- BLO – back loop only
- Rnd – round
- Row – row
- st(s) – stitch(es)
- sk – skip
- rep – repeat
- [ ] – work instructions within brackets as directed
UK: sc = dc, hdc = htr, dc = tr.
Special Stitches Explained
- Magic Ring: Wrap yarn around your index finger twice to create a movable loop. Insert hook into center of ring, yarn over, and pull up a loop. Ch 1 to secure, then work the first round of stitches directly into the ring. Pull the tail strand to close the center hole tight.
- Invisible Decrease (dec): Insert hook into the front loop only of the next stitch, then insert hook into the front loop only of the following stitch (3 loops on hook). Yarn over and pull through the first 2 loops, yarn over and pull through the remaining 2 loops.
Pattern Instructions
Pattern Notes
- Work the star panels in joined rows or continuous rounds as indicated; the branch mounting cone is worked in continuous spiral rounds without joining.
- Use a stitch marker at the start of every round for spiral pieces.
Section 1: Star Panels (Soft Gold, make 2 identical)
You will make two identical five-pointed stars that will be sewed together. Each star is worked outward from the center core into five distinct points.
Rnd 1: In a magic ring, work 5 sc. Join with sl st to first sc. (5 sc)
Rnd 2: Ch 1, work 2 sc in each st around. Join with sl st. (10 sc)
Rnd 3: Ch 1, *1 sc in next st, inc in next st; rep from * around. Join with sl st. *(15 sc)*
Rnd 4: Ch 1, *1 sc in each of next 2 sts, inc in next st; rep from * around. Join with sl st. *(20 sc)*
Rnd 5: Ch 1, *1 sc in each of next 3 sts, inc in next st; rep from * around. Join with sl st. *(25 sc)*
Rnd 6: Ch 1, *1 sc in each of next 4 sts, inc in next st; rep from * around. Join with sl st. *(30 sc)*
Now you will work the five points individually. You will work back and forth in rows along each of the 5 sections.
Point 1:
Row 1: Ch 1, sc in next 6 sts, turn, leaving remaining 24 sts unworked. (6 sc)
Row 2: Ch 1, dec, sc in next 2 sts, dec, turn. (4 sc)
Row 3: Ch 1, sc in each st across, turn. (4 sc)
Row 4: Ch 1, [dec] twice, turn. (2 sc)
Row 5: Ch 1, sc in each st across, turn. (2 sc)
Row 6: Ch 1, dec, fasten off yarn, leaving a short tail to weave in. (1 sc)
Attach yarn to the next unworked stitch on Rnd 6.
Points 2 to 5: Repeat Rows 1 to 6 for the remaining four points around the star center.
✅ Checkpoint: You now have two flat, five-pointed star panels with clean edges. Weave in all loose ends on the inside faces of both panels before moving to the branch cone.
Section 2: Branch Mounting Cone (Soft Gold, make 1)
The cone is worked in continuous spiral rounds from the wide base down to the narrow opening that slides onto your tree branch.
Rnd 1: Ch 24, join with sl st to form a ring, being careful not to twist the chain. (24 ch)
Rnd 2: Ch 1, work 1 sc in each ch around. Do not join; work in spiral rounds from here. (24 sc)
Rnds 3 to 10: Sc in each st around. (24 sc)
Rnd 11: *1 sc in each of next 2 sts, dec; rep from * around. *(18 sc)*
Rnds 12 to 14: Sc in each st around. (18 sc)
Rnd 15: *1 sc in next st, dec; rep from * around. *(12 sc)*
Rnd 16: Sc in each st around. Sl st in next st and fasten off, leaving a 12-inch (30 cm) tail for sewing. (12 sc)
Section 3: Assembly & Finishing
- Attach Cone to Back Panel: Center the wide base of the finished mounting cone onto the back center of one star panel. Using the 12-inch tail and your yarn needle, whipstitch securely through the base of the cone and around Rnds 4-5 of the star panel.
- Join Panels: Place the front star panel and back star panel (with cone attached) wrong sides together, matching all five points and inner indentations.
- Seaming and Stuffing: Join Soft Gold yarn at any bottom inner corner. Working through both thicknesses simultaneously, single crochet evenly around the entire star perimeter. When you have worked about 80% around the star and only two points remain open, insert a small handful of polyester fiberfill into the center and points to give the star its puffy 3D shape. Do not overstuff. Complete the remaining single crochets around the final point.
- Final Closure: Join with a sl st to the first st, fasten off, and use the yarn needle to weave the remaining tail securely inside the stitches.
Size Customization Tips
- To make a larger star for a tall ceiling tree, start your magic ring with 6 sc, increase up to Rnd 8 (40 sts total before splitting into 5 points of 8 sts each), and lengthen the branch cone by adding 4 extra straight rounds.
- To make a smaller topper for a tabletop tree, stop increase rounds at Rnd 4 (20 sts total, 4 sts per point) and reduce the cone starting chain to 18 stitches.
Care Instructions
Spot clean gently with a damp cloth and mild detergent. Do not submerge in water or machine wash, as moisture can alter the fiberfill shape and soften the firm structure of the metallic yarn. Store flat in a dry box after the holidays.
FAQ
Can I use regular cotton yarn instead of metallic gold?
Yes! Any DK-weight mercerized cotton or acrylic yarn will work wonderfully if you prefer a matte finish over the metallic shimmer shown in the photo. Just match your hook size to maintain a firm, sturdy fabric.
How do I keep the star from leaning forward on the tree?
Make sure you push the mounting cone firmly down onto a sturdy vertical branch tip. If your tree’s top branch is thin or flexible, tuck a small wooden dowel or floral wire alongside the branch and slip the cone over both for extra support.
Is this tree topper safe to use around young children?
Yes, because it is entirely soft crocheted fabric with no rigid plastic frames, glass, or heavy wire. If you give the star to toddlers as a playful holiday toy after taking it off the tree, simply ensure no loose yarn loops remain.
Happy Crocheting!
I hope you love dressing your Christmas tree with this handmade gold star topper. Be sure to save this pattern to your holiday Pinterest boards and drop a comment below to share what color yarn you chose for your festive tree!
📄 Your free PDF pattern
⏳ Preparing your free PDF… 30s
Like this one? Save it for later.