Plump Turkey Gnome Crochet Shelf Sitter Free Thanksgiving Pattern
Reader Favorites










Sunburst Granny Square Crochet Pouf Cover Free Crochet Pattern

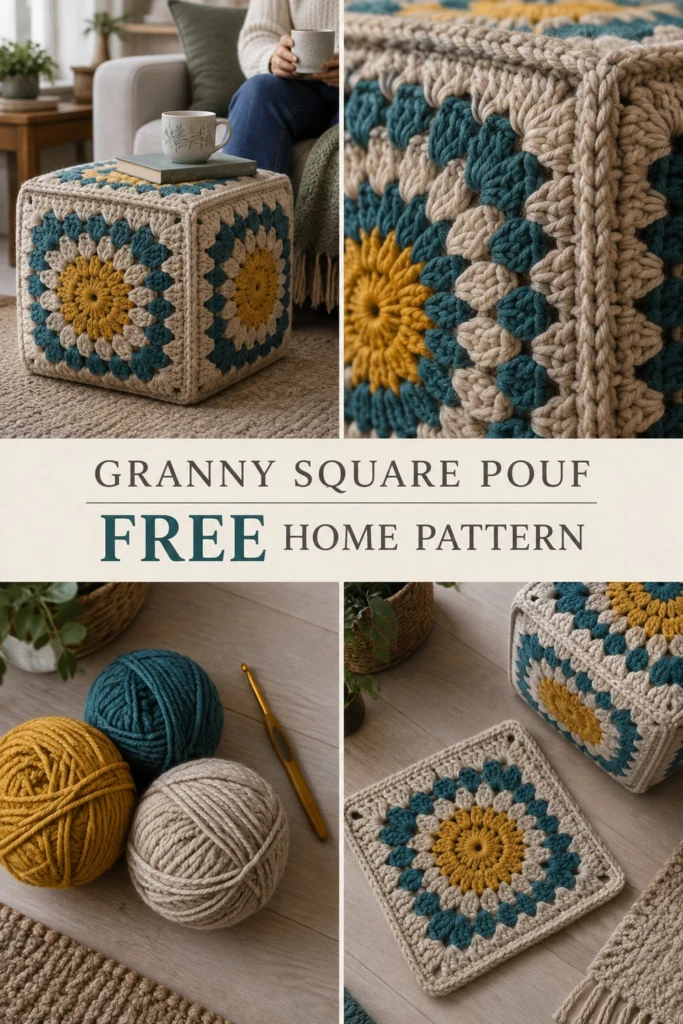
Bring cozy boho warmth and functional style to your living space with this sunburst granny square pouf cover. Crafted from six extra-large sunburst motifs worked in rich mustard yellow, deep teal, and natural cream, this sturdy floor cushion combines classic granny square charm with modern textured seaming. Whether used as a comfy footrest, casual floor seating for movie nights, or a statement piece in your reading nook, this project is as enjoyable to stitch as it is to use.
Sunburst Granny Square Crochet Pouf Cover Free Crochet Pattern
Quick Facts
- Skill level: Easy / Intermediate
- Finished size: 16 in x 16 in x 16 in (40.5 cm x 40.5 cm x 40.5 cm) cube
- Yarn: Super Bulky (Category 6) wool blend or acrylic yarn in three colors
- Hook: 9.0 mm (US M-13) crochet hook
- Stitches used: magic ring, ch, sc, hdc, dc, tr, puff stitch, 3-dc cluster, sl st
- Time to make: 8 to 12 hours
Size customization tips are included further down in the guide.
What Makes This Sunburst Granny Square Pouf Special
- Radiant Sunburst Core: Each square begins with a vibrant Mustard Yellow center that blooms into Cream and Dark Teal petal clusters, echoing the bohemian palette of modern home decor.
- Architectural Raised Seams: Rather than invisible sewing, the six panels are joined using prominent raised single crochet seams worked on the right side in Cream yarn. This adds structural stability to hold the cube shape crisp while creating a bold framing outline.
- Removable & Washable Design: The bottom panel features an integrated zipper opening, allowing you to easily remove the cover for spot cleaning or washing.
- Sturdy Fabric Structure: Worked with a dense super bulky yarn and a snug hook size, the fabric resists stretching out when sat upon or used as a footrest.
Skill Level
This project is suitable for an adventurous beginner or confident intermediate crocheter. You will need to know how to:
– Work in joined rounds
– Execute specialty cluster and puff stitches (detailed step-by-step below)
– Transition from circular motifs to square corners
– Join motifs with a raised single crochet seam
If you are comfortable with basic stitches and working in the round, the step-by-step instructions will guide you smoothly through every stage.
Finished Measurements
| Dimension | Inches | Centimeters |
|---|---|---|
| Width | 16.0 in | 40.5 cm |
| Depth | 16.0 in | 40.5 cm |
| Height | 16.0 in | 40.5 cm |
| Individual Motif (Flat) | 16.0 in x 16.0 in | 40.5 cm x 40.5 cm |
Materials You Will Need
| Material | Details | Quantity / Measurement |
|---|---|---|
| Color A (Mustard Yellow) | Super Bulky (Cat 6); 100% Acrylic or Wool Blend | 120 yds / 110 m |
| Color B (Dark Teal) | Super Bulky (Cat 6); 100% Acrylic or Wool Blend | 240 yds / 220 m |
| Color C (Cream) | Super Bulky (Cat 6); 100% Acrylic or Wool Blend | 420 yds / 384 m |
| Crochet Hook | 9.0 mm (US M-13) or size needed to obtain gauge | 1 hook |
| Pouf Insert / Stuffing | 16″ x 16″ x 16″ high-density foam block or pillow insert | 1 insert |
| Zipper | Heavy-duty nylon cushion zipper (Cream or Off-White) | 14 in / 35 cm |
| Tapestry Needle | Large eye yarn needle for weaving ends | 1 needle |
| Stitch Markers | Locking stitch markers for layout alignment | 8 markers |
Yarn Suggestions
| Yarn Brand & Line | Fiber Content | Skein Details | Notes |
|---|---|---|---|
| Lion Brand Wool-Ease Thick & Quick | 80% Acrylic, 20% Wool | 106 yds (97 m) / 170 g | Excellent stitch definition, durable cushion structure. |
| Bernat Softee Chunky | 100% Acrylic | 108 yds (99 m) / 100 g | Soft, budget-friendly, fully machine washable. |
| Paintbox Yarns Simply Super Bulky | 100% Acrylic | 65 yds (60 m) / 100 g | Wide range of modern home decor shades. |
⚠️ Note: Avoid lightweight standard worsted yarn unless you intend to double or triple strand it. Soft roving yarns without plies may pill easily when sat on, so a multi-plied or spun acrylic/wool yarn is recommended for high durability.
Gauge
| Stitch Pattern | Gauge Count | Dimensions |
|---|---|---|
| Single Crochet (Dense Seam) | 8 sts x 9 rows | 4 in x 4 in (10 cm x 10 cm) |
| Sunburst Square (Rnds 1–4) | Motif Center | 9.0 in (23.0 cm) diameter |
| Sunburst Square (Rnds 1–8 Complete) | 1 Square Panel | 16.0 in x 16.0 in (40.5 cm x 40.5 cm) |
Abbreviations
| Abbreviation | Full Term (US Crochet Terms) |
|---|---|
| ch | chain |
| sl st | slip stitch |
| sc | single crochet |
| hdc | half double crochet |
| dc | double crochet |
| tr | treble (triple) crochet |
| st(s) | stitch(es) |
| sp(s) | space(s) |
| rnd(s) | round(s) |
| YO | yarn over |
| Puff St | Puff Stitch (see Special Stitches) |
| 3-dc cluster | 3 Double Crochet Cluster (see Special Stitches) |
UK Conversion: sc = dc, hdc = htr, dc = tr, tr = dtr.
Special Stitches Explained
1. Magic Ring (Magic Circle)
Wrap yarn around your left fingers to form a loop. Insert hook into loop, YO and pull up a loop. Ch 3 (counts as first dc), then work required stitches directly into loop. Pull tail firmly to close center tight.
2. Puff Stitch (Puff St)
- YO, insert hook into designated stitch, YO and pull up a loop to the height of a dc (3 loops on hook).
- YO, insert hook into same stitch, YO and pull up a loop (5 loops on hook).
- YO, insert hook into same stitch, YO and pull up a loop (7 loops on hook).
- YO and pull through all 7 loops on hook.
- Ch 1 to lock the puff stitch.
3. 3-Double Crochet Cluster (3-dc cluster)
- YO, insert hook into designated space, YO and pull up a loop, YO and draw through 2 loops (2 loops on hook).
- YO, insert hook into same space, YO and pull up a loop, YO and draw through 2 loops (3 loops on hook).
- YO, insert hook into same space, YO and pull up a loop, YO and draw through 2 loops (4 loops on hook).
- YO and draw through all 4 loops on hook.
Pattern Instructions
Pattern Notes
- The crochet pouf cover consists of 6 identical Sunburst Granny Squares.
- Rounds 1 through 8 are joined with a slip stitch at the end of each round.
- Color sequence per square: Rounds 1–2 in Mustard Yellow, Round 3 in Cream, Round 4 in Dark Teal, Round 5 in Cream, Round 6 in Dark Teal, Rounds 7–8 in Cream.
- Do not turn your work between rounds; always work with the right side facing you.
Section 1: Sunburst Granny Square (Make 6)
With Color A (Mustard Yellow):
- Rnd 1: Form a magic ring. Ch 3 (counts as 1 dc), work 15 dc into ring. Pull tail tight to close ring. Join with sl st to top of starting ch-3. (16 dc)
- Rnd 2: Ch 1, (Puff St in next dc, ch 1) 16 times. Join with sl st to top of first Puff St. Fasten off Color A. (32 sts)
With Color C (Cream):
- Rnd 3: Join Color C with a sl st in any ch-1 sp. Ch 2, 2-dc cluster in same sp (counts as first 3-dc cluster), ch 1, (3-dc cluster in next ch-1 sp, ch 1) 15 times. Join with sl st to top of starting cluster. Fasten off Color C. (32 sts)
With Color B (Dark Teal):
- Rnd 4: Join Color B with a sl st in any ch-1 sp. Ch 2, 2-dc cluster in same sp (counts as first 3-dc cluster), ch 1, (3-dc cluster in next ch-1 sp, ch 1) 15 times. Join with sl st to top of starting cluster. Fasten off Color B. (32 sts)
With Color C (Cream):
- Rnd 5: Join Color C in any ch-1 sp.
*(3 tr, ch 2, 3 tr) in same ch-1 sp (corner made), 3 dc in next ch-1 sp, 3 hdc in next ch-1 sp, 3 dc in next ch-1 sp; repeat from * 3 more times. Join with sl st to top of first tr. Fasten off Color C. (68 sts)
✅ Checkpoint: Your circular motif has now squared off into 4 flat sides. Each side between corner ch-2 spaces contains 9 stitches (3 dc, 3 hdc, 3 dc).
With Color B (Dark Teal):
- Rnd 6: Join Color B in any corner ch-2 sp.
*(3 dc, ch 2, 3 dc) in corner ch-2 sp, 3 dc in space between next 3-st group, 3 dc in space between next 3-st group, 3 dc in space between next 3-st group, 3 dc in space between next 3-st group; repeat from * 3 more times. Join with sl st to top of first dc. Fasten off Color B. (80 sts)
With Color C (Cream):
- Rnd 7: Join Color C in any corner ch-2 sp.
*(3 dc, ch 2, 3 dc) in corner ch-2 sp, 3 dc in each of next 5 spaces between 3-st groups along side; repeat from * 3 more times. Join with sl st to top of first dc. (92 sts) - Rnd 8: Ch 1, sc in each dc across to corner, *(2 sc, ch 1, 2 sc) in corner ch-2 sp, sc in each of next 21 dc along side; repeat from * 3 more times, ending with remaining sc along starting edge. Join with sl st to first sc. Fasten off Color C and weave in ends. (104 sts)
Assembly
Cube Layout
- Lay 1 square flat to serve as the Top Panel.
- Arrange 4 squares around the top panel to form the Side Panels.
- Place the remaining 1 square at the bottom to serve as the Base Panel.
       +-------+
       |  TOP  |
+------+-------+------+------+
| SIDE | SIDE  | SIDE | SIDE |
+------+-------+------+------+
       | BASE  |
       +-------+
Raised Single Crochet Seaming Method
To achieve the defined, thick corded seams shown in the photos:
1. Align two squares with WRONG SIDES TOGETHER (Right sides facing outward).
2. Attach Color C (Cream) at any corner ch-1 space, inserting hook through BOTH layers (matching stitch for stitch).
3. Work 1 sc in each matching st along the side, working 1 sc through the corner ch-1 spaces at each end.
4. Keep tension firm so seams stand up straight and form rigid edges around the cube structure.
Step-by-Step Cube Assembly:
- Join Sides to Top: Seam all 4 side panels to the 4 edges of the top panel.
- Join Vertical Edges: Seam the 4 vertical side edges where the adjacent side panels meet. You now have an open cube box.
- Attach Base & Zipper:
- Seam 3 of the 4 edges of the Base Panel to the bottom of the side panels using the raised sc seam.
- On the 4th base edge, sew the 14-inch heavy-duty zipper using needle and strong matching thread along the inner edge of the sc border.
Finishing
- Insert Cushion: Open the zipper completely. Slide your 16″ x 16″ x 16″ foam cube or dense pillow insert inside the cover.
- Align Corners: Push the corners of the insert firmly into the inside corners of the crochet cube.
- Zip & Shape: Zip closed and pat the sides into a crisp square shape.
- Weave Ends: Double check all yarn ends are neatly woven into the wrong side of the fabric.
💡 Designer Tip: If using loose polyfill stuffing instead of a pre-cut foam block, sew a simple 16″ fabric inner liner from cotton muslin first. This prevents stuffing fibers from poking out through the crochet cluster gaps!
Size Customization Tips
- Smaller Pouf / Footstool (12 in / 30.5 cm): Omit Round 7 (Cream granny cluster) and Round 8. Work a single round of sc directly over Round 6.
- Larger Floor Cushion (20 in / 51 cm): Repeat Round 7 using Color B (Dark Teal) for an extra 3-dc cluster round before adding two rounds of sc framing.
- Rectangular Ottoman: Make 2 squares for top/bottom, and 4 rectangular side panels (worked in turned rows of granny stripe to match side lengths).
Care Instructions
- Spot Cleaning: Wipe small spots with a damp cloth and mild detergent.
- Machine Washing: Unzip cover, remove insert. Machine wash cover inside a mesh laundry bag on gentle cycle in cold water.
- Drying: Lay flat on a towel to dry. Do not tumble dry high to avoid shrinkage or stretching out of wool blends.
FAQ
Can I use worsted weight yarn doubled instead of super bulky yarn?
Yes! Holding two strands of standard worsted weight (Category 4) yarn together with an 8.0 mm or 9.0 mm hook achieves an identical gauge and stiff structure for this crochet floor cushion.
How do I prevent the granny square pouf from sagging over time?
Structure comes from two things: tight crochet tension and a firm insert. Using high-density upholstery foam (rather than loose fiberfill) ensures the top stays flat enough to place a tray or mug on.
Is this crochet home decor pattern suitable for outdoor use?
If you make the cover using 100% outdoor acrylic or polypropylene yarn and use a waterproof outdoor foam block inside, it works wonderfully on covered patios or decks!
Happy Crocheting!
You are all done! You now have a gorgeous, handcrafted sunburst granny square pouf cover that brings handmade warmth and texture into your home. Save this pattern to your Pinterest board for gift season, and share your finished color combinations with the Hook & Hearth community!
📄 Your free PDF pattern
⏳ Preparing your free PDF… 30s
Like this one? Save it for later.