Reader Favorites
Linen Stitch Crochet Tutorial For Beginners Free Crochet Pattern
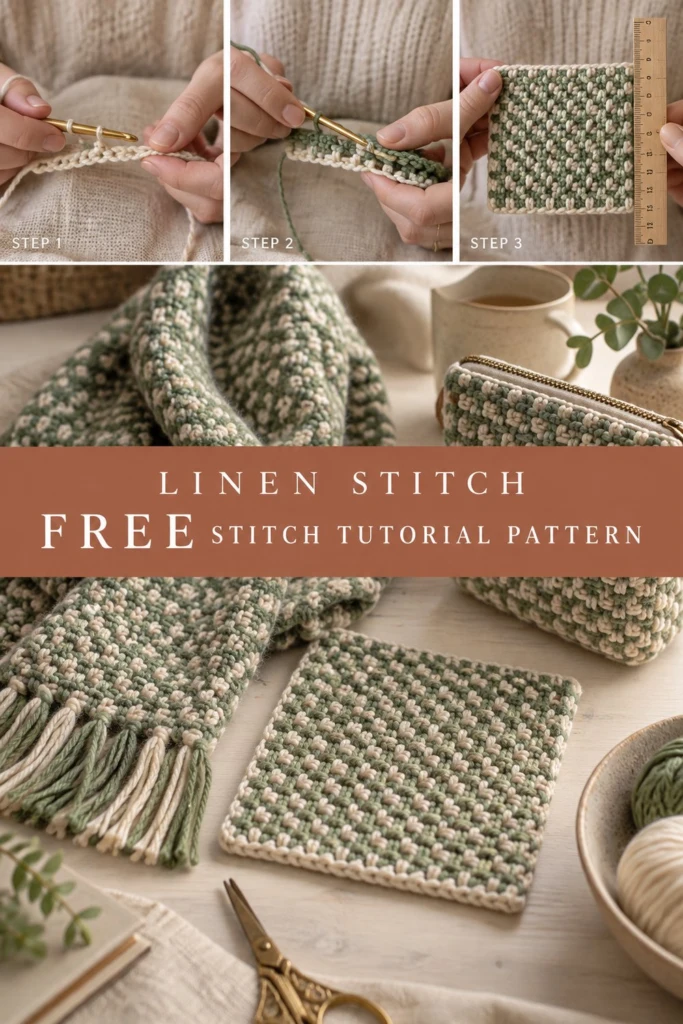
If your standard single crochet fabric feels stiff, holey, or curls at the edges, the linen stitch (also known as the moss or granite stitch) is your ultimate fix. By alternating simple single crochets and chain spaces—and working into the chain spaces of the row below—you create a dense, woven fabric that lies perfectly flat and drapes like a dream. Whether you want to make a cozy striped scarf, a modern coaster set, or a sturdy zippered pouch, this step-by-step tutorial will guide you through mastering this essential stitch from start to finish.
Linen Stitch Crochet Tutorial For Beginners Free Crochet Pattern
Quick Facts
- Skill level: Easy / Advanced Beginner
- Finished size: Coaster: 4.25″ x 4.25″ (11 x 11 cm); Pouch: 8″ x 5.5″ (20 x 14 cm); Scarf: 7″ x 60″ (18 x 152 cm)
- Yarn: Medium Worsted Weight (#4) Cotton in Cream and Sage Green
- Hook: 5.0 mm (US H-8) crochet hook
- Stitches used: Chain (ch), Single Crochet (sc), Slip Stitch (sl st)
- Time to make: 30 minutes for coaster; 2 hours for pouch; 8 hours for scarf
Note: Instructions for customizing the length and width of any linen stitch project are included further down in this guide.
What Makes This Linen Stitch Special
The linen stitch creates an interlocking, woven texture that resembles woven linen fabric. In this pattern, alternating yarn colors on every row highlights the stitch geometry, creating a crisp, two-tone pattern with zero effort. Because every stitch is anchored in a chain space rather than the tight top loops of a traditional stitch, the resulting fabric has incredible flexibility and zero curling—making it ideal for flat home goods, cozy wearables, and structured bags.
Skill Level
This project is suitable for advanced beginners who can comfortably hold a hook and manage basic tension. Required skills include:
– Working basic foundation chains
– Single crochet stitches
– Working into chain spaces
– Changing yarn colors at row ends
If you can work a chain and a single crochet, you have all the tools needed to succeed with this tutorial!
Finished Measurements
| Project | Width (Inches) | Length (Inches) | Width (cm) | Length (cm) |
|---|---|---|---|---|
| Swatch / Coaster | 4.25 in | 4.25 in | 11 cm | 11 cm |
| Zippered Pouch | 8.0 in | 5.5 in | 20 cm | 14 cm |
| Striped Scarf | 7.0 in | 60.0 in | 18 cm | 152 cm |
Materials You Will Need
| Material | Specification | Yardage (Coaster) | Yardage (Pouch) | Yardage (Scarf) | Total Yardage |
|---|---|---|---|---|---|
| Cream Yarn | Medium (#4) Worsted Cotton | 12 yds (11 m) | 45 yds (41 m) | 220 yds (201 m) | 277 yds (253 m) |
| Sage Green Yarn | Medium (#4) Worsted Cotton | 10 yds (9 m) | 40 yds (37 m) | 210 yds (192 m) | 260 yds (238 m) |
| Crochet Hook | 5.0 mm (US H-8) | 1 required | 1 required | 1 required | 1 required |
| Tapestry Needle | Steel yarn needle | 1 required | 1 required | 1 required | 1 required |
| Scissors | Craft or yarn scissors | 1 required | 1 required | 1 required | 1 required |
| Zipper | 8-inch (20 cm) cream zipper | N/A | 1 required | N/A | 1 required |
| Sewing Thread | Off-white / Cream thread & needle | N/A | 1 set | N/A | 1 set |
Yarn Suggestions
| Brand & Yarn Line | Fiber Content | Skein Weight / Length | Notes |
|---|---|---|---|
| Lion Brand 24/7 Cotton | 100% Mercerized Cotton | 3.5 oz (100g) / 186 yds (170 m) | Crisp stitch definition, sleek sheen, holds shape perfectly. |
| Paintbox Yarns Cotton Aran | 100% Cotton | 1.75 oz (50g) / 93 yds (85 m) | Matte finish, wide color palette, budget-friendly. |
| Lily Sugar ‘n Cream Cotton | 100% Natural Cotton | 2.5 oz (70.9g) / 120 yds (109 m) | Absorbent, highly durable for coasters and dishcloths. |
⚠️ Note: Avoid using loosely plied acrylics or textured novelty yarns for your first linen stitch attempt. Smooth, tightly spun cotton or cotton blends make the chain spaces easy to spot and prevent hook splitting.
Gauge
| Stitch Pattern | 4 in x 4 in (10 cm x 10 cm) |
|---|---|
| Linen Stitch Pattern | 18 stitches (9 sc + 9 ch-1 sp) x 18 rows |
Abbreviations
| Abbreviation | US Term Description |
|---|---|
| ch | Chain stitch |
| sc | Single crochet |
| sl st | Slip stitch |
| st(s) | Stitch(es) |
| sp(s) | Space(s) |
| sk | Skip |
| rnd(s) | Round(s) |
| rep | Repeat |
| YO | Yarn over |
UK Conversion Note: UK Double Crochet (dc) = US Single Crochet (sc); UK Half Treble (htr) = US Half Double Crochet (hdc).
Special Stitches Explained
1. Changing Colors in Linen Stitch
To create clean, seamless color stripes without harsh knots:
1. Work the final single crochet of the row until you have 2 loops on your hook.
2. Drop the current color to the back of your work.
3. Place the new yarn color over your hook (YO) and pull through both loops to complete the single crochet.
4. Chain 2 with the new color and turn your work to begin the next row.
2. Working into the Turning Chain Space
In linen stitch, the turning ch-2 at the start of a row counts as [1 sc + 1 ch-1 space]. When completing a row, your final single crochet must be worked directly into the open space under the turning chain of the previous row (not into the chain loops themselves).
Pattern Instructions
Pattern Notes
- The foundation chain must always be an EVEN number.
- The turning ch-2 at the beginning of each row counts as 1 sc and 1 ch-1 space.
- All single crochets after Row 1 are worked into the ch-1 spaces of the row below, skipping the single crochet posts completely.
- Carry unused yarn colors gently up the side edge when making the swatch or pouch panels, or snip ends to create fringe when making the scarf.
Section 1: Linen Stitch Swatch / Coaster (Cream & Sage Green, make 1)
With Cream yarn, chain 20.
Row 1 (Cream): Sc in the 4th ch from hook (skipped 3 ch count as first sc and ch-1 sp, see Step 1 photo), *ch 1, sk 1 ch, sc in next ch; rep from * across to end. Turn. *(19 sts)*
💡 Designer Tip: Make sure your foundation chain isn’t pulled too tight, or the bottom edge of your coaster will draw inward.
Row 2 (Sage Green): Join Sage Green on last pull-through of Row 1. Ch 2 (counts as sc + ch-1 sp), sc in first ch-1 sp, *ch 1, sk next sc, sc in next ch-1 sp; rep from * across, placing final sc into the turning ch-3 space from Row 1 (see Step 2 photo). Turn. *(19 sts)*
Rows 3 to 18: Repeat Row 2, alternating Cream on odd-numbered rows and Sage Green on even-numbered rows. Do not fasten off Cream at the end of Row 18. (19 sts per row)
✅ Checkpoint: Measure your swatch without border. It should measure 4 in x 4 in (10 x 10 cm) (see Step 3 photo).
Edging Border (Cream)
Rnd 1: With Cream yarn still attached, ch 1, turn to work along the outer edge:
– Side 1 (Left Edge): Work 18 sc evenly down the row-ends (1 sc per row-end).
– Corner 1: (1 sc, ch 2, 1 sc) in corner.
– Side 2 (Bottom Foundation): Work 18 sc across the foundation chain edge.
– Corner 2: (1 sc, ch 2, 1 sc) in corner.
– Side 3 (Right Edge): Work 18 sc evenly up the row-ends.
– Corner 3: (1 sc, ch 2, 1 sc) in corner.
– Side 4 (Top Edge): Work 18 sc across the top stitches (1 sc in each sc and ch-1 sp).
– Corner 4: (1 sc, ch 2, 1 sc) in corner.
Join with sl st to first sc. Fasten off and weave in ends. (80 sc)
Section 2: Linen Stitch Scarf (Cream & Sage Green, make 1)
With Cream yarn, chain 32.
Row 1 (Cream): Sc in 4th ch from hook, *ch 1, sk 1 ch, sc in next ch; rep from * across. Turn. *(31 sts)*
Row 2 (Sage Green): Change to Sage Green. Ch 2, sc in first ch-1 sp, *ch 1, sk next sc, sc in next ch-1 sp; rep from * across, finishing with sc in turning ch space. Turn. *(31 sts)*
Rows 3 to 270: Repeat Row 2, alternating Cream and Sage Green every row. Fasten off leaving 6-inch tails at the end of each row. (31 sts per row)
Scarf Fringe
- Cut 128 lengths of yarn (64 Cream, 64 Sage Green), each measuring 12 inches (30 cm) long.
- Bundle 4 strands together (2 Cream, 2 Sage Green). Fold the bundle in half to form a loop.
- Insert hook through a stitch on the short end of the scarf, pull loop through, then pull yarn ends through loop to secure.
- Attach 1 bundle into each of the 16 stitch spaces on both ends (32 fringe knots total). Trim ends straight to 4.5 inches (11.5 cm).
Section 3: Linen Stitch Zippered Pouch (Cream & Sage Green, make 2 panels)
With Cream yarn, chain 36.
Row 1 (Cream): Sc in 4th ch from hook, *ch 1, sk 1 ch, sc in next ch; rep from * across. Turn. *(35 sts)*
Row 2 (Sage Green): Change to Sage Green. Ch 2, sc in first ch-1 sp, *ch 1, sk next sc, sc in next ch-1 sp; rep from * across, finishing with sc in turning ch space. Turn. *(35 sts)*
Rows 3 to 25: Repeat Row 2, alternating Cream and Sage Green every row. Fasten off. (35 sts per row)
Assembly
Pouch Joining
- Place the two pouch panels wrong sides together, aligning the row stripes.
- Join Cream yarn at top left corner to join 3 outer sides (leaving top open):
- Side 1: 25 sc down row-ends.
- Bottom: 35 sc across foundation stitches.
- Side 2: 25 sc up row-ends.
Fasten off. (85 sc) - Pin the 8-inch cream zipper into the top opening of the pouch. Using cream thread and a sewing needle, stitch zipper securely to both inside top edges using a neat backstitch.
Finishing
- Weave in ends: Use your tapestry needle to weave all loose yarn ends through the thick single crochet sections on the back of your fabric.
- Blocking: Pin finished coasters and pouch flat on a blocking board. Lightly steam with an iron held 2 inches away (or spray with water) and leave to dry completely.
Size Customization Tips
Because the linen stitch relies on a simple two-stitch repeat, customizing the dimensions of your project is mathematically straightforward:
- Foundation Chain Rule: Always start with an EVEN number of chains.
- Width Adjustments: Every 2 foundation chains add 1 stitch repeat (1 sc + 1 ch-1 space). At the gauge of 18 sts per 4 inches, 2 chains add approximately 0.44 inches (1.1 cm) in width.
- Length Adjustments: Every 2 rows add approximately 0.44 inches (1.1 cm) in height.
Care Instructions
- Washing: Machine wash cold on delicate cycle or hand wash in lukewarm water with mild liquid soap.
- Drying: Reshape while damp and lay flat to dry on a dry towel. Do not tumble dry to prevent shrinkage.
- Ironing: Warm steam iron can be applied directly to 100% cotton pieces to crisp up the edges.
FAQ
What is the difference between linen stitch, moss stitch, and granite stitch?
They are three names for the exact same stitch technique! All three terms refer to alternating single crochet and chain-1 spaces where single crochets are worked into the chain spaces of the row below.
Can I make this project using acrylic yarn instead of cotton?
Yes! Acrylic yarn works wonderfully for scarves and blankets because of its soft drape. However, for coasters and zippered pouches, 100% cotton is recommended because it holds its structure better and handles heat/washing easily.
Why is my linen stitch fabric curling at the foundation edge?
If the bottom edge curls upward, your initial foundation chain was worked too tightly. Redo your foundation chain using a hook size 0.5 mm or 1.0 mm larger than the hook you use for the main rows.
Happy Crocheting!
You have now mastered the linen stitch! Save this pattern to your favorite crochet board on Pinterest so you can reference the stitch breakdown whenever you start a new project. Leave a comment below sharing what colors you picked for your coaster, pouch, or scarf!
📄 Your free PDF pattern
⏳ Preparing your free PDF… 30s
Like this one? Save it for later.