Reader Favorites
Overflowing Crochet Cornucopia Centerpiece Free Thanksgiving Pattern
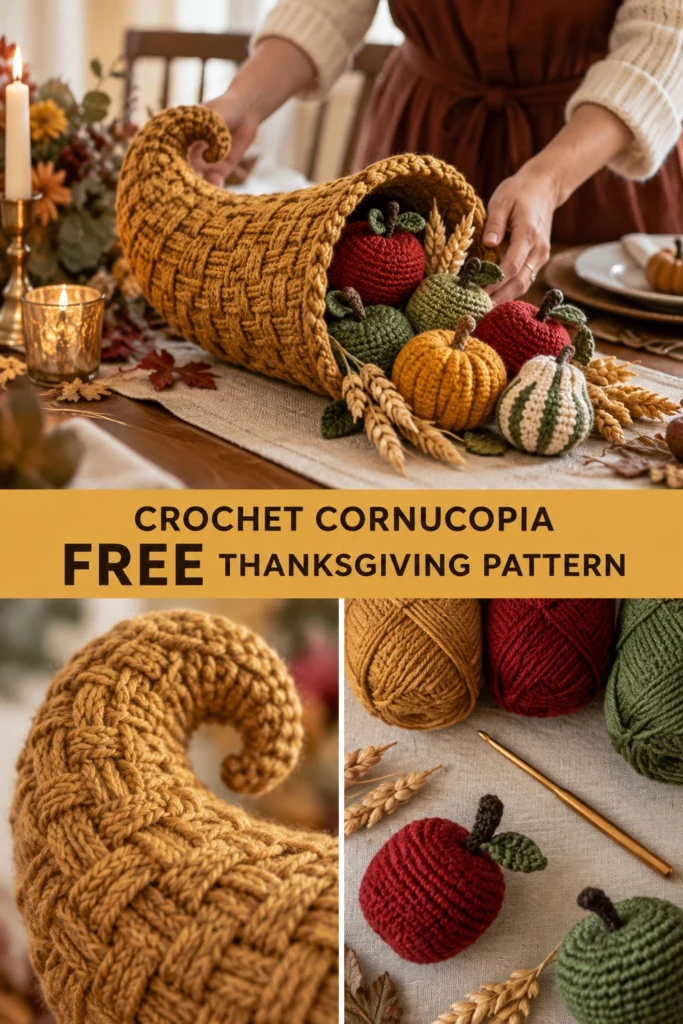
Bring the warm, rustic bounty of the harvest straight to your holiday table with a centerpiece that never wilts and grows a little more charming every year. This stunning display features a structured basketweave horn overflowing with freshly picked miniature autumn produce.
Overflowing Crochet Cornucopia Centerpiece Free Thanksgiving Pattern
Quick Facts
- Skill level: Intermediate
- Finished size: Cornucopia Horn measures 12 inches (30.5 cm) long and 5.5 inches (14 cm) across the opening. Small apples and gourds measure approximately 2 inches (5 cm) to 3 inches (7.5 cm) tall.
- Yarn: Worsted-weight (Aran / 4-ply) yarn in Mustard Gold, Crimson Red, Olive Green, Rust Orange, Cream, and Dark Brown.
- Hook: US H/8 (5.0 mm) crochet hook
- Stitches used: ch, sl st, sc, hdc, dc, bpdc (back post double crochet), fpdc (front post double crochet)
- Time to make: Approximately 10 to 12 hours total for the horn and all fruit pieces.
💡 Designer Tip: Size customization tips and gauge adjustments are included further down to help you scale your centerpiece.
What Makes This Crochet Thanksgiving Centerpiece Special
The magic of this project lies in the combination of textured stitches and clever shaping. The cornucopia horn uses a continuous spiral basketweave technique that creates thick, interlocking ridges, giving it the strength to hold its iconic curved shape without collapsing. The narrow tip is heavily stuffed and tightly bent, while the wide opening naturally flares to cradle the handmade apples, pumpkins, and gourds spilling out onto your holiday table.
Skill Level
- Required Skills:
- Working in the round (spiral) and flat rows
- Post stitches (Front Post and Back Post double crochet) for basketweave texture
- Basic amigurumi increases and invisible decreases
- Changing colors cleanly
- Reassurance: If you have basic amigurumi experience and understand post stitches, you have all the skills needed to complete this stunning holiday centerpiece!
Finished Measurements
| Item | Width / Diameter | Length / Height |
|---|---|---|
| Cornucopia Horn | 5.5 in (14.0 cm) opening | 12.0 in (30.5 cm) curved length |
| Small Apple (Red / Green) | 2.2 in (5.5 cm) diameter | 2.0 in (5.0 cm) height |
| Striped Gourd | 2.0 in (5.0 cm) diameter | 3.0 in (7.5 cm) height |
| Ribbed Pumpkin | 3.0 in (7.5 cm) diameter | 2.2 in (5.5 cm) height |
Materials You Will Need
| Color Name | Yarn Weight | Fiber | Yards | Meters |
|---|---|---|---|---|
| Mustard Gold | Worsted (4) | 100% Acrylic | 280 yds | 256 m |
| Crimson Red | Worsted (4) | 100% Acrylic | 60 yds | 55 m |
| Olive Green | Worsted (4) | 100% Acrylic | 60 yds | 55 m |
| Rust Orange | Worsted (4) | 100% Acrylic | 40 yds | 37 m |
| Cream | Worsted (4) | 100% Acrylic | 20 yds | 18 m |
| Dark Brown | Worsted (4) | 100% Acrylic | 30 yds | 27 m |
- Hook: US H/8 (5.0 mm) crochet hook
- Notions: Yarn needle, stitch markers, polyester fiberfill stuffing, scissors
Yarn Suggestions
| Yarn Line | Weight | Notes |
|---|---|---|
| Lion Brand Vanna’s Choice | Worsted (4) | Excellent stitch definition, firm structure for basketweave |
| Red Heart Super Saver | Worsted (4) | Highly durable, holds rigid amigurumi shapes well |
| Caron Simply Soft | Worsted (4) | Softer sheen; use a 4.5 mm hook to maintain firmness |
⚠️ Note: Avoid novelty, eyelash, or extremely fuzzy yarns for this project. They obscure the intricate basketweave texture of the horn and make stitch counts difficult to track.
Gauge
- Cornucopia Horn: 14 sts x 10 rows = 4 in (10 cm) in basketweave pattern using a US H/8 (5.0 mm) hook.
- Fruit: 16 sc x 18 rows = 4 in (10 cm) in single crochet.
Abbreviations
- approx: approximately
- beg: beginning
- bpdc: back post double crochet
- ch: chain
- dc: double crochet
- dec: decrease (single crochet 2 stitches together)
- fpdc: front post double crochet
- hdc: half double crochet
- inc: increase (work 2 single crochets in the same stitch)
- rep: repeat
- rnd(s): round(s)
- row(s): row(s)
- sc: single crochet
- sk: skip
- sl st: slip stitch
- st(s): stitch(es)
- [ ]: work instructions within brackets as many times as directed
UK Conversion Note: UK sc = US dc, UK hdc = US tr, UK dc = US dtr. (This pattern is written in standard US terms.)
Special Stitches Explained
- Basketweave Stitch (FPdc / BPdc): Worked over a multiple of stitches. Front post double crochet (fpdc) is worked around the post of the stitch from the front to the back. Back post double crochet (bpdc) is worked around the post of the stitch from the back to the front. This creates a woven fabric texture.
- Invisible Decrease (inv-dec): Insert hook into the front loop only of the next two stitches, yarn over, pull through both front loops, yarn over and pull through remaining two loops on hook.
Pattern Instructions
Pattern Notes
- Unless otherwise stated, work in continuous spiral rounds for the fruit items. The cornucopia horn is worked in joined rounds to keep alignment for the basketweave texture.
- Use a stitch marker at the beginning of rounds to keep your place.
Section 1: Cornucopia Horn (Mustard Gold, make 1)
The horn begins at the narrow tip, builds outward in basketweave rounds, and flares toward the wide opening.
Rnd 1: In magic ring, work 6 sc, sl st to join (6 sc)
Rnd 2: Ch 2 (does not count as st here and throughout), [2 fpdc in next st] x 6, sl st to join (12 fpdc)
Rnd 3: Ch 2, [1 fpdc in next st, 2 fpdc in next st] x 6, sl st to join (18 fpdc)
Rnd 4: Ch 2, [1 fpdc, 1 bpdc, inc in next st] x 6, sl st to join (24 sts)
Rnd 5: Ch 2, [2 fpdc, 2 bpdc, inc in next st] x 6, sl st to join (30 sts)
Rnds 6 to 8: Ch 2, work basketweave pattern maintaining 5 sts per block (3 fpdc, 2 bpdc alternating) around, increasing 6 evenly spaced sts in Rnd 8 (36 sts on Rnd 6; 36 sts on Rnd 7; 42 sts on Rnd 8)
Rnds 9 to 12: Ch 2, work basketweave pattern around (42 sts)
Rnd 13: Ch 2, work basketweave pattern around, increasing 6 evenly spaced sts (48 sts)
Rnds 14 to 17: Ch 2, work basketweave pattern around (48 sts)
Rnd 18: Ch 2, work basketweave pattern around, increasing 6 evenly spaced sts (54 sts)
Rnds 19 to 22: Ch 2, work basketweave pattern around (54 sts)
Rnd 23: Ch 2, work basketweave pattern around, increasing 6 evenly spaced sts (60 sts)
Rnds 24 to 28: Ch 2, work basketweave pattern around (60 sts)
Fasten off Mustard Gold, weave in ends. Firmly stuff the narrow tip end and gently curve it upward. Leave the main body of the horn lightly stuffed or empty so it holds its natural shape.
Section 2: Red Apple (Crimson Red, make 2)
Rnd 1: In magic ring, work 6 sc (6 sc)
Rnd 2: [inc] x 6 (12 sc)
Rnd 3: [1 sc, inc] x 6 (18 sc)
Rnd 4: [2 sc, inc] x 6 (24 sc)
Rnd 5: [3 sc, inc] x 6 (30 sc)
Rnds 6 to 10: sc in each st around (30 sc)
Rnd 11: [3 sc, dec] x 6 (24 sc)
Rnd 12: [2 sc, dec] x 6 (18 sc)
Stuff firmly with fiberfill.
Rnd 13: [1 sc, dec] x 6 (12 sc)
Rnd 14: [dec] x 6 (6 sc)
Fasten off, leaving a long tail. Thread tail through front loops of remaining 6 stitches and pull tight to close.
Apple Stem (Dark Brown, make 2):
Ch 5, working in 2nd ch from hook, sl st in each ch across (4 sl st). Fasten off, leaving a tail to sew to top of apple.
Apple Leaf (Olive Green, make 2):
Ch 4, sl st in 2nd ch from hook, hdc in next ch, (sc, ch 1, sc) in last ch, working along opposite side of foundation chain: hdc in next ch, sl st in last ch. Fasten off.
Section 3: Green Apple (Olive Green, make 1)
Follow instructions for Red Apple using Olive Green yarn. Add Stem and Leaf using Dark Brown and Olive Green.
Section 4: Ribbed Pumpkin (Mustard Gold, make 1)
Rnd 1: In magic ring, work 6 sc (6 sc)
Rnd 2: [inc] x 6 (12 sc)
Rnd 3: [1 sc, inc] x 6 (18 sc)
Rnd 4: [2 sc, inc] x 6 (24 sc)
Rnd 5: [3 sc, inc] x 6 (30 sc)
Rnd 6: [4 sc, inc] x 6 (36 sc)
Rnds 7 to 14: sc in each st around (36 sc)
Rnd 15: [4 sc, dec] x 6 (30 sc)
Rnd 16: [3 sc, dec] x 6 (24 sc)
Stuff firmly with fiberfill.
Rnd 17: [2 sc, dec] x 6 (18 sc)
Rnd 18: [1 sc, dec] x 6 (12 sc)
Rnd 19: [dec] x 6 (6 sc)
Fasten off, close opening.
Shaping Ribs: Thread a long strand of Mustard Gold onto your yarn needle. Insert the needle from bottom center to top center, pull tight across the outside to indent a rib, and repeat 6 evenly spaced times around the pumpkin to create distinct pumpkin segments. Secure and weave in ends.
Pumpkin Stem (Dark Brown, make 1):
Ch 6, working in 2nd ch from hook, sl st in next 2 ch, sc in next 2 ch, 2 sc in last ch. Fasten off, sew to top of pumpkin.
Section 5: Striped Gourd (Cream and Olive Green, make 1)
Begin with Cream.
Rnd 1: In magic ring, work 6 sc in Cream (6 sc)
Rnd 2: [inc] x 6 in Cream (12 sc)
Rnd 3: [1 sc in Cream, 1 sc in Olive Green] x 6, changing colors every stitch to create vertical stripes (12 sc)
Rnds 4 to 8: [2 sc in Cream, 2 sc in Olive Green] x 3 around, carrying unused yarn behind (24 sc)
Rnds 9 to 11: [1 sc in Cream, 1 sc in Olive Green] x 12 around (24 sc)
Rnd 12: [2 sc, dec] alternating colors across (18 sc)
Stuff firmly with fiberfill.
Rnd 13: [1 sc, dec] across (12 sc)
Rnd 14: [dec] x 6 (6 sc)
Fasten off, close opening.
Gourd Stem (Dark Brown, make 1):
Ch 7, sl st in 2nd ch from hook and each ch across (6 sl st). Sew to top of gourd.
Section 6: Wheat Stalks (Cream, make 6)
Row 1: Ch 12, working in 2nd ch from hook, sl st in next 2 ch, [ch 3, sl st in 2nd ch from hook, sc in next ch, sl st in base ch] in next 6 sts, sl st to end of chain. Fasten off, leaving a tail. Attach to base of cornucopia opening so they spill outward.
Assembly
- Horn Positioning: Rest your finished cornucopia horn horizontally on your table or holiday runner, propping the curved tip slightly upward.
- Spilling Produce: Arrange the Ribbed Pumpkin, Red Apples, Green Apple, and Striped Gourd so they cascade naturally out of the horn’s wide opening.
- Wheat Accents: Tuck the Cream wheat stalks into the crevices between the fruit and the inner rim of the horn. Secure with discreet stitches or fabric glue if desired.
Finishing
- Weave in all remaining yarn tails securely inside the pieces.
- Lightly steam block the wheat stalks and leaves if they curl at the edges.
Size Customization Tips
- Larger Cornucopia: To make a larger horn, continue adding basketweave increase rounds (increasing 6 sts per round) every 4 rounds until your desired opening width is achieved. Each additional 6-stitch repeat adds approximately 1.5 inches to the horn’s diameter.
- Miniature Produce: Swap your worsted weight yarn for sport-weight yarn and a 3.5 mm hook to create tiny fruit accents for place settings or napkin rings.
Care Instructions
Spot clean your crochet cornucopia centerpiece with a damp cloth and mild soap. Do not submerge in water if heavily stuffed. Air dry completely before storing.
FAQ
Can I machine wash the completed centerpiece?
Because the pieces are stuffed with polyester fiberfill and shaped with structured post stitches, machine washing is not recommended. Spot cleaning will keep your centerpiece looking fresh for years.
How do I keep the cornucopia horn from rolling over?
Ensure the bottom underside of the horn is slightly flattened when you place it on the table. You can also anchor it with a small dab of hot glue on the underside or rest it against a sturdy pumpkin or placemat.
Can I use scrap yarn for the fruit?
Yes! The small apples, gourds, and pumpkins are wonderful stash-busting projects. Feel free to mix and match traditional autumn shades like burgundy, golden yellow, burnt orange, and sage green.
Happy Crocheting!
I hope you love bringing this cozy harvest centerpiece to your holiday table! Be sure to save this pin on Pinterest and leave a comment below sharing what colors you chose for your cornucopia fruit. Have a wonderful and festive holiday season!
📄 Your free PDF pattern
⏳ Preparing your free PDF… 30s
Like this one? Save it for later.