Plump Turkey Gnome Crochet Shelf Sitter Free Thanksgiving Pattern
Reader Favorites











Tiny Gift Box Crochet Christmas Ornament Free Christmas Pattern

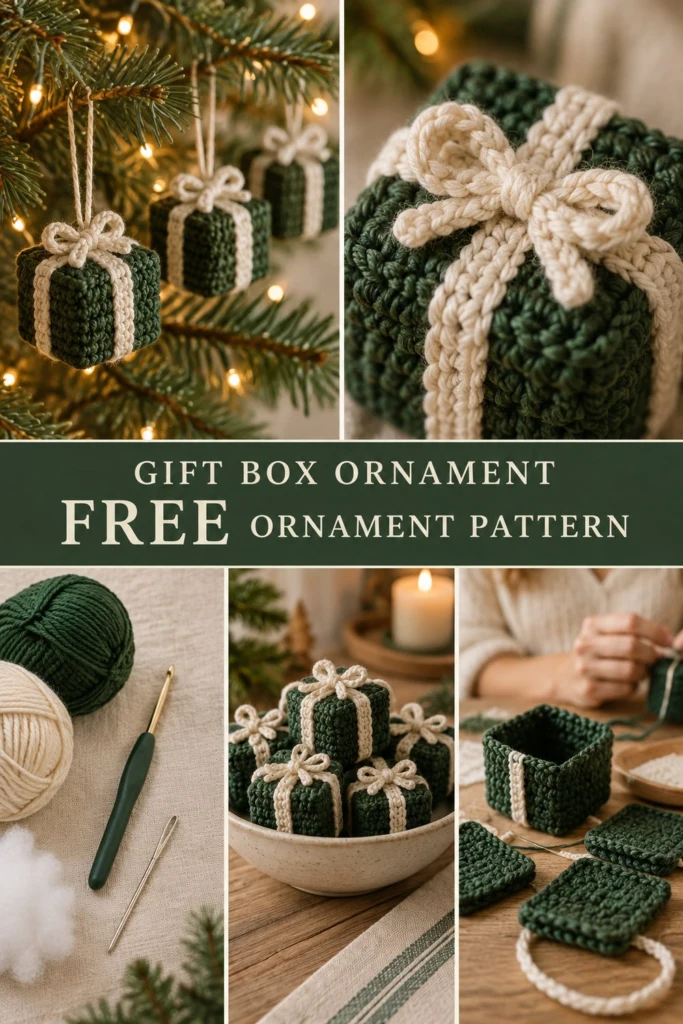
Hang the smallest, sweetest present right on your tree with this delightful little gift box ornament! Featuring a tiny textured cube topped with a neat flat bow, these charming ornaments are the ultimate holiday scrap-buster.
Tiny Gift Box Crochet Christmas Ornament Free Christmas Pattern
Quick Facts
- Skill level: Easy / Intermediate
- Finished size: 2 inches wide by 2 inches high (5 cm x 5 cm)
- Yarn: Sport weight 100% cotton yarn in Pine Green and Cream
- Hook: 3.0 mm (US C/2) crochet hook
- Stitches used: ch, sl st, sc, inc, dec
- Time to make: 1 hour per ornament
💡 Designer Tip: Size adjustment tips are included further down if you want to make larger decorative gift boxes for your mantel!
What Makes This Crochet Gift Box Ornament Special
Unlike flat ornaments, this crochet gift box ornament is constructed as a true three-dimensional cube. Working in continuous rounds of single crochet creates a dense, sturdy fabric that holds its shape and keeps the light stuffing securely hidden inside. The cream ribbon is created using surface slip stitches wrapped around the finished body and tied securely into a crisp, neat flat bow, just like a real wrapped present.
Skill Level
- Working in continuous spiral rounds without joining
- Basic increases and invisible decreases
- Simple surface crochet slip stitching
- Assembling and attaching a hanging loop
⚠️ Note: For babies under 3, ensure all hanging loops and ribbons are securely double-knotted and trimmed, or omit the hanging loop to use strictly as tree-safe bowl fillers.
Finished Measurements
| Dimension | Inches | Centimeters |
|---|---|---|
| Width | 2.0 in | 5.0 cm |
| Height | 2.0 in | 5.0 cm |
| Depth | 2.0 in | 5.0 cm |
Materials You Will Need
| Material | Color | Type / Weight | Quantity |
|---|---|---|---|
| Yarn A | Pine Green | Sport weight 100% cotton | 20 yards (18 meters) |
| Yarn B | Cream | Sport weight 100% cotton | 10 yards (9 meters) |
| Hook | — | 3.0 mm (US C/2) | 1 hook |
| Notions | — | Polyester fiberfill stuffing | Small handful |
| Notions | — | Tapestry needle | 1 needle |
| Notions | — | Stitch marker | 1 marker |
| Notions | — | Twine or matching yarn | 8 inches (20 cm) for hanging loop |
Yarn Suggestions
| Brand | Line | Skein Yardage | Notes |
|---|---|---|---|
| Schachenmayr | Catania | 137 yds / 50g | Exceptional stitch definition and rich holiday colors |
| Hobbii | Rainbow Cotton 8/4 | 186 yds / 50g | Affordable, smooth, 100% mercerized cotton |
| Drops | Safran | 175 yds / 50g | Beautiful matte finish, perfect for tiny ornaments |
⚠️ Note: Avoid novelty, fuzzy, or mohair yarns for this project. You need a smooth cotton yarn to achieve the crisp, square geometry and distinct stitch texture shown in the photos.
Gauge
- Stitch Gauge: 24 sts x 26 rows = 4 inches (10 cm) in single crochet.
- Circle Gauge: Rnds 1 to 6 of the flat box base = 2.0 inches (5.0 cm) across.
Abbreviations (US Terminology)
- ch: chain
- sl st: slip stitch
- sc: single crochet
- inc: single crochet 2 in same stitch (increase)
- dec: invisible single crochet 2 together (decrease)
- BLO: back loop only
- st(s): stitch(es)
- Rnd(s): round(s)
- rep: repeat
- sk: skip
- FO: fasten off
UK conversion note: UK sc = US dc, UK hdc = US tr, UK dc = US dtr.
Special Stitches Explained
- Magic Ring: Wrap yarn around your index finger twice, insert hook under loops, pull up a loop, ch 1, and work the first round of stitches into the ring. Pull tail to close tightly.
- Invisible Decrease (dec): Insert hook into front loop only of next st, then front loop only of following st (3 loops on hook). Yarn over and pull through first 2 loops, yarn over and pull through remaining 2 loops.
Pattern Instructions
Pattern Notes
- The body of the gift box is worked in continuous spiral rounds without joining. Use a stitch marker to track the first stitch of each round.
- Stuff the box lightly just before closing so it retains a crisp, square box shape rather than a rounded ball shape.
Section 1: Box Body (Pine Green, make 1)
Rnd 1: With Pine Green, work 6 sc in a magic ring (6 sc).
Rnd 2: [Inc] x 6 (12 sc).
Rnd 3: [1 sc, inc] x 6 (18 sc).
Rnd 4: [2 sc, inc] x 6 (24 sc).
Rnd 5: [3 sc, inc] x 6 (30 sc).
Rnd 6: [4 sc, inc] x 6 (36 sc).
Rnd 7: Working in BLO for this round only to create the sharp bottom corner edge, sc in each st around (36 sc).
Rnds 8 to 18: Working in both loops normally, sc in each st around (36 sc).
Rnd 19: [4 sc, dec] x 6 (30 sc).
Rnd 20: [3 sc, dec] x 6 (24 sc).
Stuff the box firmly with fiberfill at this point, shaping the corners into a neat cube.
Rnd 21: [2 sc, dec] x 6 (18 sc).
Rnd 22: [1 sc, dec] x 6 (12 sc).
Rnd 23: [Dec] x 6 (6 sc).
FO, leaving an 8-inch (20 cm) tail. Thread tail through tapestry needle, weave through front loops of remaining 6 stitches, and pull tightly to close the top completely. Weave in ends securely inside the body.
Section 2: Ribbon Cross-Wraps (Cream, make 2 long strips)
Row 1: With Cream, ch 38, starting in 2nd ch from hook, sl st in each ch across (37 sl st). FO, leaving a 6-inch (15 cm) tail for sewing.
Section 3: Miniature Bow (Cream, make 1)
Step 1: Ch 14, join with sl st to first ch to form a small ring.
Step 2: (Ch 5, work 3 treble crochet into the ring, ch 5, sl st into the ring) twice to form the two loops of the bow.
Step 3: Wrap yarn tightly around the center of the bow 4 times to cinch it into a neat bow shape, securing tightly on the back. FO, leaving a 6-inch tail.
Assembly
- Ribbon Placement: Take one Cream strip and wrap it vertically around the Pine Green box body, centering it across the top and bottom. Pin in place. Take the second Cream strip and wrap it horizontally around the box, intersecting the first strip to form a cross on all four sides. Secure the ends neatly on the top center of the box.
- Bow Attachment: Sew or glue the Miniature Bow directly over the center intersection of the cream ribbon on the top of the box.
- Hanging Loop: Cut an 8-inch (20 cm) piece of matching twine or Cream yarn. Thread it securely under the top knot of the bow, fold in half, and tie the ends in a secure knot to create the tree-hanging loop.
✅ Checkpoint: Your finished ornament should measure 2×2 inches, hold a firm cube shape, and feature clean cream ribbon crosses intersecting neatly beneath a tiny centered bow.
Size Customization Tips
To make a larger gift box ornament (e.g., a 3-inch box), continue increasing the base flat circle by adding another round ([5 sc, inc] x 6 = 42 sc), work 6 extra straight body rounds, and increase your starting chain length for the ribbon wraps by 12 stitches.
Care Instructions
Spot clean gently with a damp cloth and mild soap. Do not submerge in water or machine wash to preserve the inner fiberfill shape and crisp cardboard-like box corners.
FAQ
Can I use acrylic yarn instead of cotton?
Yes, you can use acrylic yarn, but cotton yarn is strongly recommended because its lack of stretch helps the box maintain its sharp, square cube shape without sagging.
How do I keep the box from looking round?
The secret to the square shape is working Rnd 7 entirely in the Back Loop Only (BLO), which creates a sharp ridge. Additionally, make sure you firmly push fiberfill into the four bottom and top corners as you stuff before closing.
Are these safe for a tree with pets or toddlers?
Yes, because they are soft yarn cubes with no hard plastic components or wire frames. Just ensure all yarn tails are securely woven in and hanging loops are tightly knotted.
Happy Crocheting!
I hope you love making these charming little presents for your holiday tree! Be sure to save this pin on Pinterest and leave a comment below sharing what festive color combinations you chose for your gift boxes. Happy holidays!
📄 Your free PDF pattern
⏳ Preparing your free PDF… 30s
Like this one? Save it for later.