Reader Favorites
Maple Leaf Crochet Mantel Garland Free Thanksgiving Pattern

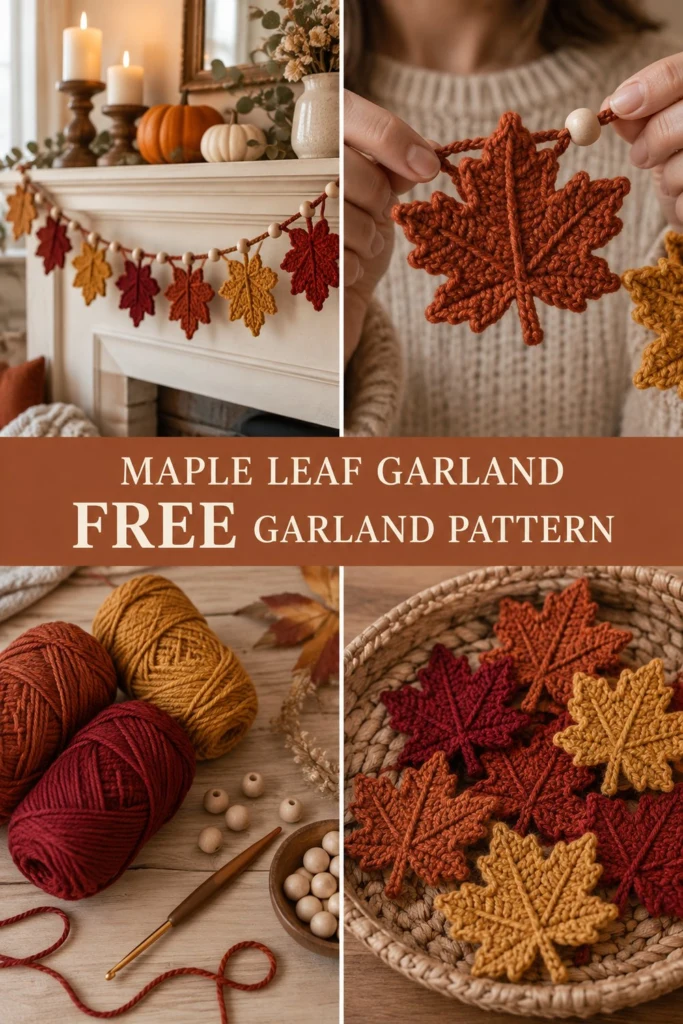
Bring the warmth of autumn right into your home with this cozy handmade mantel garland. Each maple leaf features five pointed lobes with a textured surface-stitched central vein, strung along a cord spaced with warm wooden beads. It is an approachable autumn project that turns scrap yarn into lasting Thanksgiving decor.
Maple Leaf Crochet Mantel Garland Free Thanksgiving Pattern
Quick Facts
- Skill level: Intermediate
- Finished size: Leaf: 4.5 in x 4.5 in (11.5 cm x 11.5 cm); Garland: 60 in (152 cm) long
- Yarn: Worsted weight (Category 4) yarn in Rust, Burgundy, Mustard Gold, and Cinnamon
- Hook: 4.0 mm (US G/6) crochet hook
- Stitches used: ch, sc, hdc, dc, tr, sl st, picot
- Time to make: 8 to 10 hours total (approx. 45–60 minutes per leaf plus assembly)
💡 Designer Tip: Size adjustment tips for altering the length of your garland are included further down in this guide.
What Makes This Maple Leaf Garland Special
This pattern captures the classic, iconic outline of a maple leaf using clever stitch graduation—scaling from single crochets up to treble crochets and ending with picot points at each apex. The distinct surface-slip-stitched vein details running up the leaf center and side lobes add a three-dimensional depth that mimics real fallen foliage. Combined with smooth natural wood beads and a clean color-blocked palette of autumn shades, this garland delivers a high-end decorative finish for your mantel or holiday hearth.
Skill Level
- Required skills: Working in the round from a magic ring, stitch height graduation (sc through tr), picot stitch, surface slip stitch embroidery, threading beads, and weaving in ends.
- Reassurance: The leaf motif is worked entirely in three continuous rounds, making the repeat rhythm simple to master after your very first leaf.
Finished Measurements
| Dimension | Inches | Centimeters |
|---|---|---|
| Single Leaf Width | 4.5 in | 11.5 cm |
| Single Leaf Height (including stem) | 4.5 in | 11.5 cm |
| Garland Length (8 leaves + beads) | 60 in | 152 cm |
| Hanging End Loops (each side) | 8 in | 20 cm |
Materials You Will Need
| Item / Color | Yarn Weight / Type | Quantity / Yardage |
|---|---|---|
| Rust | Worsted Weight (Cat. 4) | 25 yds / 23 m |
| Burgundy | Worsted Weight (Cat. 4) | 25 yds / 23 m |
| Mustard Gold | Worsted Weight (Cat. 4) | 25 yds / 23 m |
| Cinnamon | Worsted Weight (Cat. 4) | 35 yds / 32 m (includes assembly cord) |
- Crochet Hook: 4.0 mm (US G/6)
- Notions: 18 natural wooden beads (12mm to 15mm with at least a 3mm hole), tapestry needle, scissors, stitch marker.
Yarn Suggestions
| Yarn Line | Weight | Notes |
|---|---|---|
| Lion Brand Vanna’s Choice | Worsted (Cat. 4) | Excellent stitch clarity and ideal rich fall shades. |
| Caron Simply Soft | Worsted (Cat. 4) | Soft feel with a subtle sheen that accents stitch lines. |
| Red Heart Super Saver | Worsted (Cat. 4) | Sturdy and crisp acrylic that holds leaf points flat. |
⚠️ Note: Avoid heavily textured, fuzzy, or bouclé yarns. Unstructured fibers obscure the picot points and make surface slip-stitching difficult to see.
Gauge
| Pattern Section | Measurement |
|---|---|
| Rnds 1–2 of Leaf Base | 1.75 in (4.5 cm) in diameter |
| Completed 3-Rnd Leaf | 4.5 in (11.5 cm) wide from tip to tip |
Abbreviations
| Term | Description |
|---|---|
| ch | chain |
| sc | single crochet |
| hdc | half double crochet |
| dc | double crochet |
| tr | treble crochet |
| sl st | slip stitch |
| st(s) | stitch(es) |
| Rnd | Round |
| picot | ch 2, sl st in 2nd ch from hook |
UK Terms: sc = dc, hdc = htr, dc = tr, tr = dtr.
Special Stitches Explained
- Magic Ring: Form a yarn loop around your fingers, insert hook, pull up a loop, ch 1 to anchor, then work Rnd 1 stitches directly into the adjustable loop. Pull tail firmly to close.
- Picot Point: Chain 2, then insert your hook into the 2nd chain from the hook and make a slip stitch. This forms the small crisp point at the end of each leaf lobe.
- Surface Slip Stitch Veins: Hold yarn underneath the completed leaf. Insert hook from front to back through the leaf stitches at the base, yarn over underneath, and pull a loop through to the front. Insert hook into the next stitch up along the center line, yarn over underneath, and pull through both the leaf and the loop on your hook.
Pattern Instructions
Section 1: Maple Leaves (Make 8 total: 2 Rust, 2 Burgundy, 2 Mustard Gold, 2 Cinnamon)
Note: Leaves are worked in continuous joined rounds. Do not turn your work between rounds.
- Rnd 1: Make a magic ring, ch 1 (does not count as a stitch), work 12 sc into the magic ring, sl st to first sc to join. (12 sc)
- Rnd 2: Ch 1, work 2 sc in each st around, sl st to first sc to join. (24 sc)
- Rnd 3 (Stem & 5 Leaf Lobes):
- Stem: Ch 4, sl st in 2nd ch from hook, sl st in next 2 ch, sl st into st 1 of Rnd 2. (Stem complete)
- Lobe 1 (Bottom Left): sc in st 2, (hdc, dc) in st 3, (dc, picot, dc) in st 4, (hdc, sc) in st 5.
- Lobe 2 (Top Left): sc in st 6, (hdc, dc) in st 7, (dc, tr, picot, tr, dc) in st 8, (dc, hdc) in st 9, sc in st 10.
- Lobe 3 (Center Apex): (hdc, dc) in st 11, (dc, 2 tr, picot, 2 tr, dc) in st 12, (dc, hdc) in st 13, sc in st 14.
- Lobe 4 (Top Right): sc in st 15, (hdc, dc) in st 16, (dc, tr, picot, tr, dc) in st 17, (dc, hdc) in st 18, sc in st 19.
- Lobe 5 (Bottom Right): sc in st 20, (hdc, dc) in st 21, (dc, picot, dc) in st 22, (hdc, sc) in st 23, sl st into st 24 at stem base. Fasten off leaving an 8 in (20 cm) tail for surface stitching. (54 sts)
✅ Checkpoint: Spread the leaf flat. You should have 5 clearly defined lobes (1 central tall lobe, 2 medium upper side lobes, and 2 smaller lower side lobes) with crisp picot tips and a stem at the base.
Section 2: Surface Vein Embroidery
- Thread the 8 in (20 cm) tail onto a tapestry needle (or use a crochet hook to surface slip stitch).
- Working from the center ring of the leaf upward, work vertical surface stitches straight up the center seam to the base of Lobe 3.
- Bring the thread back down to the center and make 2 angled surface stitches extending outward toward Lobe 2 and Lobe 4.
- Securely fasten off on the back side and weave in all loose yarn ends.
Section 3: Garland Cord & Assembly
- Row 1 (Garland Cord): Using Cinnamon yarn, leaving a 10 in (25 cm) tail, ch 35, sl st in 35th ch from hook to form Hanging Loop 1, ch 15. *Thread 2 wooden beads onto yarn using tapestry needle, sc through stem tip of next leaf, ch 12; repeat from * 6 more times (joining 7 leaves in total). Thread 2 wooden beads, sc through stem tip of 8th leaf, ch 15, ch 35, sl st in 35th ch from hook to form Hanging Loop 2. *(194 sts)*
✅ Checkpoint: Check that leaves are spaced evenly with 2 wooden beads between each motif and hanging loops secure at both ends.
Finishing
- Steam-block the maple leaves lightly with an iron on steam setting (or mist with water and pin to a blocking board) to uncurl the edges and open up the picot points.
Size Customization Tips
- To make a 72-inch mantel garland: Make 10 leaves instead of 8 (add 1 Rust and 1 Burgundy leaf). Increase the assembly repeat by adding 2 extra leaves and 4 additional wooden beads.
- Spacing adjustments: If your mantel is wider, increase the chain space between leaves from ch 12 to ch 18 (adds approx. 2 in / 5 cm of space between each leaf).
Care Instructions
- Spot clean leaves gently with a damp cloth and mild detergent.
- Do not soak wooden beads in water to prevent wood swell or finish dulling.
- Store flat between pieces of acid-free tissue paper during off-seasons.
FAQ
Can I use cotton yarn instead of acrylic?
Yes! Worsted weight cotton yarn works wonderfully for this pattern. It provides clean stitch definition and stiffens nicely when blocked, helping the leaves retain their shape without drooping.
How do I stop the wooden beads from sliding on the cord?
Tie a simple overhand knot on the yarn cord immediately before and after each pair of wooden beads to lock them into position.
How do I attach the leaves if I don’t want to crochet them directly onto the chain?
You can crochet the entire cord and bead sequence first, then use a tapestry needle and the yarn tail from each leaf stem to securely sew each leaf directly to the cord behind the beads.
Happy Crocheting!
Enjoy stitching this gorgeous autumn garland to warm up your home decor! Don’t forget to save this project to your Thanksgiving crochet board on Pinterest and share your finished color layout in the comments below!
📄 Your free PDF pattern
⏳ Preparing your free PDF… 30s
Like this one? Save it for later.