Reader Favorites
Holly Berry Crochet Christmas Pot Holder Free Christmas Pattern
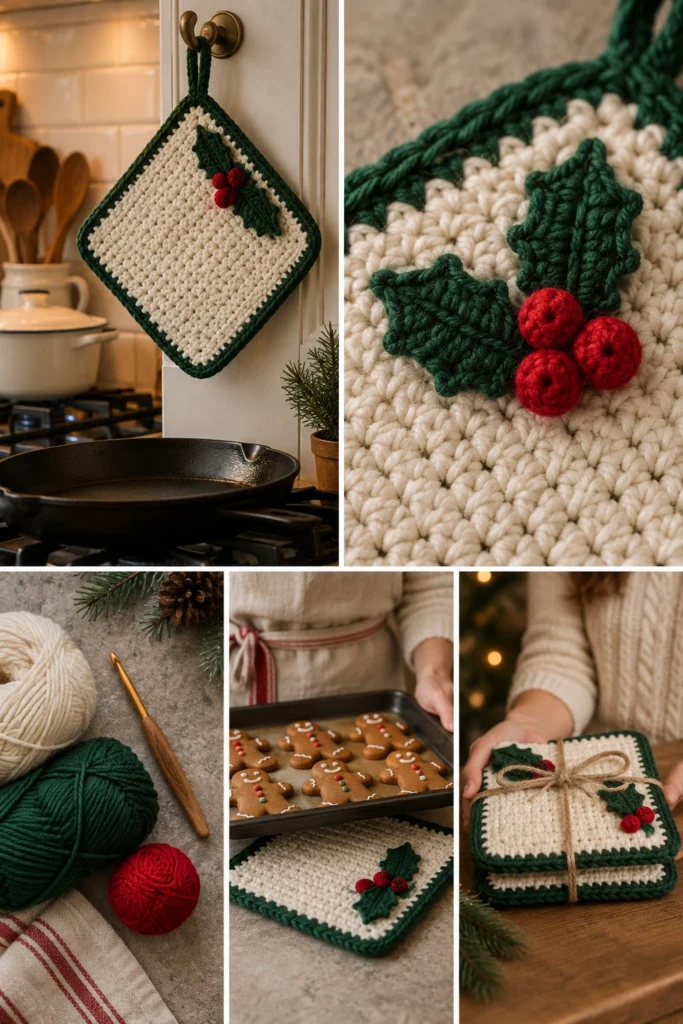
Bring festive warmth and practical holiday charm to your kitchen with this double-thick Christmas pot holder. Featuring a classic cream single-crochet body, a crisp forest green trim, and a decorative holly leaf and berry motif accenting one corner, this thick hot pad handles hot cast iron skillets and baking sheets with ease. It makes an ideal weekend project or holiday host gift.
Holly Berry Crochet Christmas Pot Holder Free Christmas Pattern
Quick Facts
- Skill level: Easy / Advanced Beginner
- Finished size: 8 in x 8 in (20.5 cm x 20.5 cm)
- Yarn: Medium weight / Category 4 (100% Cotton)
- Hook: 4.5 mm (US G/7)
- Stitches used: Chain (ch), Single Crochet (sc), Half Double Crochet (hdc), Double Crochet (dc), Slip Stitch (sl st)
- Time to make: 2 to 3 hours
Note: Instructions for customizing the pot holder dimensions are included at the end of the article.
What Makes This Pot Holder Special
- Double-Layer Construction: Working two flat squares and joining them with a dense single crochet border creates a double-thick layer of protection that insulates hands and surfaces against high oven temperatures.
- Pure Cotton Heat Resistance: Built entirely from 100% natural cotton yarn, this pad won’t melt or scorch under hot pans, making it safe for stovetop and oven duty.
- Dimensional Holly Motif: Dimensional green leaves with textured picot edges and three raised red berries add a traditional holiday touch without interfering with the pot holder’s lay-flat usability.
- Built-In Hanging Loop: A integrated corner loop allows you to display the finished piece on kitchen hooks for instant seasonal decor.
Skill Level
This pattern is suitable for an easy/advanced beginner crocheter who is comfortable with:
– Working basic stitches in flat rows.
– Working in both sides of a foundation chain (for the leaves).
– Working basic 3D shapes in continuous rounds (for the berries).
– Seaming two pieces together with a single crochet join.
Finished Measurements
| Measurement | Imperial | Metric |
|---|---|---|
| Width | 8.0 in | 20.5 cm |
| Height | 8.0 in | 20.5 cm |
| Thickness | 0.4 in | 1.0 cm |
| Hanging Loop Length | 2.5 in | 6.5 cm |
Materials You Will Need
| Material | Details | Quantity |
|---|---|---|
| Cream Cotton Yarn | Medium (4) Weight, 100% Cotton | 110 yds / 100 m |
| Forest Green Cotton Yarn | Medium (4) Weight, 100% Cotton | 35 yds / 32 m |
| Red Cotton Yarn | Medium (4) Weight, 100% Cotton | 10 yds / 9 m |
| Crochet Hook | Size 4.5 mm (US G/7) | 1 |
| Tapestry Needle | Blunt-ended yarn needle | 1 |
| Stitch Markers | Locking stitch markers | 2 |
| Scissors | Standard craft scissors | 1 pair |
Yarn Suggestions
| Yarn Brand | Skein Size | Fiber Content | Notes |
|---|---|---|---|
| Lily Sugar ‘n Cream | 120 yds / 70 g | 100% Cotton | Classic kitchen cotton, excellent stitch definition |
| Knit Picks Dishie | 190 yds / 100 g | 100% Cotton | Smooth, soft worsted cotton with minimal splitting |
| Paintbox Yarns Cotton Aran | 93 yds / 50 g | 100% Cotton | Available in rich Christmas red and green shades |
⚠️ Note: Always use 100% natural cotton yarn for kitchen pot holders and hot pads. Synthetic fibers like acrylic, polyester, or nylon can melt under heat and cause severe burns.
Gauge
| Stitch Pattern | Count over 4 in / 10 cm |
|---|---|
| Single Crochet (sc) | 16 stitches x 18 rows |
Abbreviations
| Abbreviation | Definition |
|---|---|
| ch | chain |
| sc | single crochet |
| hdc | half double crochet |
| dc | double crochet |
| sl st | slip stitch |
| st(s) | stitch(es) |
| rnd(s) | round(s) |
| rep | repeat |
| YO | yarn over |
UK equivalents: sc = dc (double crochet), hdc = htr (half treble), dc = tr (treble).
Special Stitches Explained
Picot (for leaf points)
- Chain 2.
- Insert your hook into the front loop and side bar of the previous single crochet stitch.
- Yarn over and draw through all loops on your hook to complete a slip stitch.
Magic Ring
- Loop yarn around your fingers twice, leaving a 4-inch tail.
- Insert hook through loop, yarn over, pull up a loop.
- Chain 1 (does not count as stitch), then work specified stitches directly into the yarn loop.
- Pull tail end firmly to close the central hole.
Pattern Instructions
Pattern Notes
- Turning chains do not count as stitches throughout the pattern.
- The body consists of two identical Cream squares joined around all four sides.
- Maintain firm tension so the fabric remains dense and heat-resistant.
Section 1: Main Base Squares (Cream, make 2)
Using Cream yarn:
Foundation: Ch 33.
Row 1: Sc in 2nd ch from hook and in each ch across, turn (32 sc).
Rows 2 to 36: Ch 1, sc in each st across, turn (32 sc).
Fasten off after Row 36 on the first square. On the second square, do not fasten off; weave in the starting tail only.
✅ Checkpoint: Measure your square. It should measure approximately 8 in x 8 in (20.5 cm x 20.5 cm).
Section 2: Joining Border & Hanging Loop (Forest Green)
- Stack the two Cream squares directly on top of each other with wrong sides together.
- Switch yarn to Forest Green at the final turn of the second square.
Rnd 1 (Joining): Ch 1, working through both layers simultaneously:
– Work 32 sc across the top edge.
– In the top-right corner st: (1 sc, ch 16 for hanging loop, 1 sc).
– Work 34 sc evenly down the right side edge (approx 1 sc per row end).
– In the bottom-right corner st: (1 sc, ch 1, 1 sc).
– Work 30 sc across the bottom edge.
– In the bottom-left corner st: (1 sc, ch 1, 1 sc).
– Work 34 sc evenly up the left side edge.
– In the top-left corner st: (1 sc, ch 1, 1 sc).
– Sl st to the first sc to join (140 sc, 3 ch-1 corner spaces, 1 ch-16 loop).
Rnd 2 (Edging Round): Ch 1, turn work slightly to work along outer edge:
– Sc in each st across edge to the hanging loop corner.
– In the ch-16 hanging loop space: work 20 sc directly over the chain space to form a reinforced loop.
– Sc in each st along remaining 3 edges, working 3 sc into each of the 3 corner ch-1 spaces.
– Sl st to first sc of rnd (166 sc).
Fasten off green yarn, leaving an 8-inch tail for weaving.
Section 3: Holly Leaves (Forest Green, make 2)
Using Forest Green yarn:
Foundation: Ch 9.
Rnd 1:
1. Sc in 2nd ch from hook.
2. Hdc in next ch, dc in next 2 ch, hdc in next ch, sc in next 2 ch.
3. In the last ch (tip of leaf): work (1 sc, Picot, 1 sc) to turn around the point.
4. Rotate work to stitch down the unworked side of the foundation chain: sc in next 2 ch, hdc in next ch, dc in next 2 ch, hdc in next ch, sc in last ch.
5. Sl st into the first sc to close the leaf (16 sts + 1 picot).
Fasten off, leaving a 10-inch tail on both leaves for sewing.
Section 4: Red Berries (Red, make 3)
Using Red yarn:
Rnd 1: Work 6 sc into a Magic Ring. Do not join; work in continuous spiral (6 sc).
Rnd 2: Sc in each st around (6 sc).
Fasten off, leaving an 8-inch tail. Thread tail through front loops of all 6 sts, pull tight to gather into a round berry, and knot securely.
Assembly
- Position the two Holly Leaves in the top-right corner of the pot holder, just below the hanging loop, pointing slightly outward in a V-shape.
- Using the long green yarn tails and a tapestry needle, stitch both leaves securely to the front Cream layer using neat whip stitches around the leaf edges.
- Position the three Red Berries clustered tightly together at the base where the two leaves meet.
- Using the red yarn tails, sew each berry firmly through the surface of the Cream panel. Secure knots on the inner surface or between the two layers.
Finishing
- Weave in all loose yarn ends thoroughly on the inside edge using a tapestry needle.
- Block light steam over the finished pot holder using a warm iron over a damp pressing cloth if needed to flatten the corners.
Size Customization Tips
- Smaller Coasters (5 in x 5 in): Start with Ch 21. Work Row 1 to 22 in sc. Join with Forest Green following Section 2.
- Larger Trivet / Bake Mat (10 in x 10 in): Start with Ch 41. Work Row 1 to 46 in sc. Make 3 leaves and 5 berries for proportional decoration.
Care Instructions
- Washing: Machine wash in cold or warm water on delicate cycle with mild detergent.
- Drying: Lay flat to dry on a dry towel to preserve the square shape. Avoid tumble drying on high heat to prevent cotton shrinkage.
- Ironing: Iron on medium cotton setting with steam to press flat after washing.
FAQ
Can I use acrylic yarn if I make two layers?
No. Acrylic yarn melts at low temperatures when exposed to hot cookware, which can cause severe burns or damage to kitchen countertops. Stick exclusively to 100% cotton yarn for hot pads and pot holders.
Why is my pot holder curling at the edges?
Curling occurs when single crochet tension is too tight. Try using a 5.0 mm (US H/8) hook for the cream body squares, or wet block the completed squares before joining them with the green border.
How do I make the hanging loop stronger?
To make the hanging loop extra durable, work Rnd 2 with 20 single crochets worked firmly over the chain space, or chain 18 for Rnd 1 instead of 16 to create a slightly thicker base loop.
Happy Crocheting!
You’ve completed your holiday kitchen pot holder! Save this project on Pinterest for your next festive gift swap, and leave a comment sharing your favorite holiday color variations!
📄 Your free PDF pattern
⏳ Preparing your free PDF… 30s
Like this one? Save it for later.