Plump Turkey Gnome Crochet Shelf Sitter Free Thanksgiving Pattern
Reader Favorites











Frosted No Sew Crochet Gingerbread Man Free Christmas Pattern

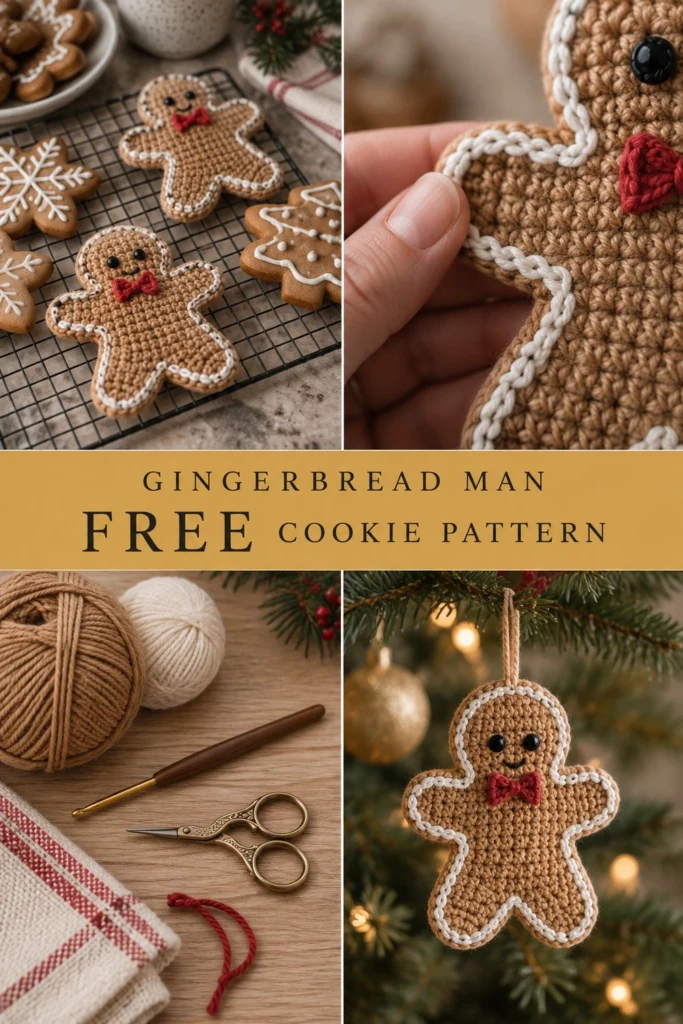
This little fellow looks like he was just pulled from the oven and frosted by hand, ready to hang on your tree or sit patiently on a plate waiting for Santa. Because the entire body is worked in one flat piece from the feet up, there are no arms or legs to sew on afterwards, and the puffy icing lines are created with simple chain stitch embroidery added on top.
Frosted No Sew Crochet Gingerbread Man Free Christmas Pattern
Quick Facts
- Skill level: Intermediate
- Finished size: 6.5 inches tall by 5 inches wide
- Yarn: Worsted weight (Category 4) in Gingerbread Brown, White, and Red
- Hook: 3.5 mm (E/4) crochet hook
- Stitches used: sc, inc, dec, sl st, ch
- Time to make: 2 to 3 hours
Size customization tips and gauge adjustments are included further down the page.
What Makes This Gingerbread Man Special
The charm of this piece lies in its smart, continuous construction and charming details. By working the entire body in flat rounds from the bottom up, you eliminate tedious limb attachment. The raised white icing is embroidered directly onto the surface using simple surface chain stitches to mimic royal icing piping, while a tiny textured red bow adds a cheerful holiday finish.
Skill Level
- Working in continuous spiral rounds
- Increasing and decreasing symmetrically
- Basic surface slip stitching and embroidery
- Making a small textured appliqué bow
💡 Designer Tip: Take your time with the white surface slip stitch icing lines. Keeping your tension loose and even will give that authentic puffy pastry look.
Finished Measurements
| Dimension | Inches | Centimeters |
|---|---|---|
| Height (Feet to Head) | 6.5 in | 16.5 cm |
| Width (Arm to Arm) | 5.0 in | 12.7 cm |
| Thickness | 0.8 in | 2.0 cm |
Materials You Will Need
| Material / Color | Type / Weight | Yards | Meters |
|---|---|---|---|
| Gingerbread Brown | Worsted / Category 4 | 60 yds | 55 m |
| White | Worsted / Category 4 | 15 yds | 14 m |
| Red | Worsted / Category 4 | 10 yds | 9 m |
| Black (small amount) | Embroidery floss | 2 yds | 2 m |
- Hook: 3.5 mm (E/4) crochet hook
- Notions: Tapestry needle, stitch markers, polyester fiberfill stuffing, scissors
Yarn Suggestions
| Brand | Line | Skein Yardage | Notes |
|---|---|---|---|
| Lion Brand | Basic Stitch Anti-Pilling | 185 yds / 170 m | Excellent stitch definition, holds shape well |
| Red Heart | Super Saver | 236 yds / 215 m | Firm texture, perfect for structured amigurumi |
| Caron | Simply Soft | 315 yds / 288 m | Beautiful sheen for holiday projects |
⚠️ Note: Avoid novelty, eyelash, or heavily textured fuzzy yarns for the main body, as they obscure the clean stitch definition needed to mimic baked gingerbread.
Gauge
- Body: 16 sts x 18 rows = 4 inches in single crochet using a 3.5 mm hook.
- Flat Circle Check: Rnds 1 to 6 measure approximately 2 inches across.
Abbreviations
- ch: chain
- sc: single crochet
- inc: single crochet increase (work 2 sc in the same st)
- dec: invisible single crochet decrease (insert hook into front loops of next 2 sts, yarn over, pull through both, yarn over and pull through 2 loops)
- sl st: slip stitch
- st(s): stitch(es)
- rnd(s): round(s)
- FO: fasten off
- BLO: back loop only
UK Conversions: sc = dc, hdc = htr, dc = tr.
Special Stitches Explained
- Magic Ring: Wrap yarn around your index finger twice to form a loop, insert hook under both strands, pull up a loop, and ch 1 to secure. Work your starting stitches directly into the ring.
- Invisible Decrease: Insert hook into the front loop only of the first stitch, then immediately insert hook into the front loop only of the second stitch. Yarn over and pull through both front loops, then yarn over and pull through remaining 2 loops on hook.
- Surface Slip Stitch (Icing Line): Hold working yarn behind your piece. Insert hook from front to back through the fabric, yarn over behind the piece, pull loop through to the front, and pull directly through the loop on your hook. Repeat along your desired path.
Pattern Instructions
Pattern Notes
- The body is worked in one piece from the feet up in continuous spiral rounds without joining. Do not slip stitch at the end of rounds unless specified. Use a stitch marker to track the first stitch of each round.
- Stuff the body firmly as you go, ensuring the arms and legs are well-packed before closing the top of the head.
Section 1: Body (Gingerbread Brown, make 1)
Left Leg
– Rnd 1: Start 6 sc in a magic ring (6 sc)
– Rnd 2: (inc) x 6 (12 sc)
– Rnds 3 to 6: sc in each st around (12 sc)
– FO leaving a short tail of 3 inches. Set aside.
Right Leg
– Rnd 1: Start 6 sc in a magic ring (6 sc)
– Rnd 2: (inc) x 6 (12 sc)
– Rnds 3 to 6: sc in each st around (12 sc)
– Do not fasten off. Now we join the legs to form the body.
Body and Head
– Rnd 7: Work 6 sc across the right leg, ch 2, then work 12 sc around the left leg, work 2 sc along the opposite side of the ch-2 bridge (28 sc)
– Rnd 8: (3 sc, inc) x 7 (35 sc)
– Rnd 9: sc in each st around (35 sc)
– Rnd 10: (4 sc, inc) x 7 (42 sc)
– Rnds 11 to 14: sc in each st around (42 sc)
– Rnd 15: Next, we shape the left arm. Work 5 sc, ch 5, starting in 2nd ch from hook work 4 sc down the chain, skip 1 st on body, 18 sc across belly, ch 5, starting in 2nd ch from hook work 4 sc down the chain, skip 1 st on body, 13 sc to end (50 sts including arms)
– Rnd 16: Work 5 sc, 4 sc along the underside of the left arm, 18 sc across back, 4 sc along the underside of the right arm, 13 sc to end (44 sc)
– Rnd 17: (2 sc, dec) x 11 (33 sc)
– Rnd 18: (1 sc, dec) x 11 (22 sc)
– Stuff the legs, body, and arms firmly with fiberfill at this point.
– Rnd 19: sc in each st around (22 sc)
– Rnd 20: (inc) x 22 (44 sc)
– Rnd 21: (3 sc, inc) x 11 (55 sc)
– Rnds 22 to 26: sc in each st around (55 sc)
– Rnd 27: (3 sc, dec) x 11 (44 sc)
– Rnd 28: (2 sc, dec) x 11 (33 sc)
– Rnd 29: (1 sc, dec) x 11 (22 sc)
– Stuff the head firmly.
– Rnd 30: (dec) x 11 (11 sc)
– Rnd 31: (dec) x 5, 1 sc (6 sc)
– FO, leaving an 8-inch tail. Thread tail through front loops of remaining 6 sts and pull tightly to close the top of the head. Weave in end securely.
✅ Checkpoint: At the end of Rnd 31, your gingerbread man should have fully formed limbs and head, standing flat and stuffed evenly without any lumps.
Section 2: Bow (Red, make 1)
- Row 1: Ch 9, starting in 2nd ch from hook, work 1 sc in each ch across, turn (8 sc)
- Rows 2 to 3: Ch 1, sc in each st across, turn (8 sc)
- FO leaving a 10-inch tail. Wrap the tail tightly around the center of the rectangle 4 to 5 times to pinch it into a bow shape, secure tightly on the back, and weave in ends.
Assembly
- Eyes and Smile: Using black embroidery floss and a tapestry needle, embroider two French knots or small straight stitches for the eyes centered between Rnds 23 and 25, spaced 4 sts apart. Embroider a small happy smile one round below the eyes.
- Bow Placement: Sew the red bow securely to the neck area centered between Rnds 20 and 21 using the remaining red yarn tail.
- Icing Lines: Using White yarn and surface slip stitching, create scalloped or zigzag piping along the outer perimeter of the arms, legs, and head approximately 1 st inward from the edge. Add two small white French knot buttons down the center of the chest on Rnds 12 and 15.
Size Customization Tips
- To make a larger gingerbread man, use bulky weight yarn (Category 5) with a 5.0 mm hook; each increase round adds approximately 0.75 inches to the overall width.
- To make a smaller ornament, use sport weight yarn (Category 2) with a 2.5 mm hook.
Care Instructions
Spot clean gently with a damp cloth and mild soap. Do not submerge in water or machine wash to protect the fiberfill stuffing and embroidered features. Reshape while damp and allow to air dry completely.
FAQ
Can I use safety eyes instead of embroidery?
Yes, you can use 6mm safety eyes, but embroidered eyes are strongly recommended if making this toy for babies or children under 3 years old to prevent choking hazards.
How do I keep the edges neat when working the arms?
When chaining for the arms in Rnd 15, make sure your starting chain is not twisted before working back down into the chain stitches.
Can I hang this on a Christmas tree?
Absolutely! Simply attach a 6-inch loop of matching brown or white yarn to the very top of the head during final assembly to turn your gingerbread man into a festive tree ornament.
Happy Crocheting!
I hope you enjoyed making your sweet new holiday friend. Save this pattern to your holiday Pinterest boards and leave a comment below to share what colors you used for your gingerbread man’s icing!
📄 Your free PDF pattern
⏳ Preparing your free PDF… 30s
Like this one? Save it for later.