Reader Favorites
Spinning Dreidel Crochet Amigurumi Free Hanukkah Pattern

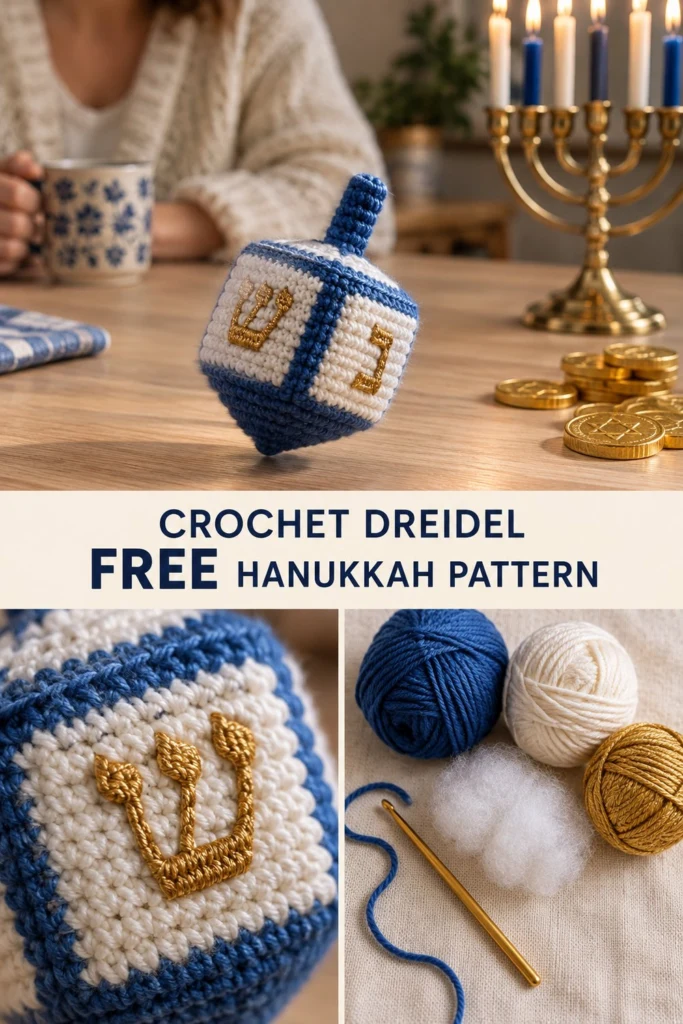
Celebrate the Festival of Lights with a handmade treasure that spins right into holiday traditions. This plush crochet dreidel features clean geometric edges, rich Royal Blue frames around crisp Off-White side panels, a sturdy spinning stem, and gleaming Metallic Gold embroidered Hebrew letters. Designed to be soft, durable, and safe for little hands, it makes a wonderful centerpiece, tabletop decoration, or playful gift for Hanukkah.
Spinning Dreidel Crochet Amigurumi Free Hanukkah Pattern
Quick Facts
- Skill level: Easy / Intermediate
- Finished size: Approximately 5.5 in (14 cm) tall by 3.25 in (8.5 cm) wide
- Yarn: Worsted weight (#4 Medium) in Royal Blue, Off-White, and Metallic Gold
- Hook: US E-4 (3.5 mm) crochet hook
- Stitches used: magic ring, single crochet (sc), increase (inc), invisible decrease (dec), back loop only (BLO)
- Time to make: 2 to 3 hours
Custom size adjustments and scaling tips are included further down in this pattern.
What Makes This Crochet Dreidel Special
Creating a clean, four-sided spinning top out of soft yarn requires thoughtful construction. This pattern achieves its signature square shape without harsh plastic inserts by using specific directional round transitions:
- Integrated Top Stem: The dreidel starts at the top handle in continuous rounds of Royal Blue, creating a dense cylinder that holds its shape when spun.
- Defined Square Shoulders: A dedicated round worked in the back loops only (BLO) creates a sharp horizontal ridge that allows the flat top cap to transition cleanly into the vertical side walls.
- Tapestry-Framed Panels: The four flat faces are worked seamlessly in continuous rounds using Off-White yarn framed by 2-stitch columns of Royal Blue at each corner.
- Surface Embroidered Hebrew Letters: The traditional four letters—Nun (נ), Gimel (ג), Hei (ה), and Shin (ש)—are embroidered onto each Off-White face using Metallic Gold yarn before stuffing.
- Weighted Point Cone: Even decreases down to the bottom point create a firm, balanced base for balanced tabletop spinning.
Skill Level
This pattern is suitable for an adventurous beginner or intermediate crocheter. You will need to know:
- Working in continuous spiral rounds
- Changing colors mid-round (tapestry style or carrying floats)
- Basic stitch increases and invisible decreases
- Basic surface embroidery (backstitch or satin stitch)
If you have never worked amigurumi before, don’t worry—the stitch pattern is repetitive, and step-by-step checks will guide you through every stage.
Finished Measurements
| Dimension | Inches | Centimeters |
|---|---|---|
| Total Height (Stem to Point) | 5.5 in | 14.0 cm |
| Body Width (Corner to Corner) | 3.25 in | 8.5 cm |
| Stem Height | 1.25 in | 3.2 cm |
| Face Panel Height | 2.25 in | 5.7 cm |
Materials You Will Need
| Item | Details | Quantity |
|---|---|---|
| Yarn A (Main Color) | Worsted Weight (#4), Royal Blue | 65 yds / 60 m |
| Yarn B (Contrast Color) | Worsted Weight (#4), Off-White | 45 yds / 41 m |
| Yarn C (Embroidery Accent) | Metallic Worsted Weight or DK, Gold | 12 yds / 11 m |
| Crochet Hook | 3.5 mm (US E-4) ergonomic hook | 1 |
| Stuffing | Premium polyester fiberfill | 1.5 oz / 42 g |
| Tapestry Needle | Blunt-ended yarn needle for embroidery | 1 |
| Stitch Marker | Locking stitch marker | 1 |
| Scissors | Small craft scissors | 1 pair |
Yarn Suggestions
| Brand & Line | Weight | Yardage per Skein | Notes |
|---|---|---|---|
| Lion Brand 24/7 Cotton | Worsted (#4) | 186 yds (170 m) / 100g | 100% Mercerized Cotton; excellent stitch definition and clean lines. |
| Paintbox Yarns Cotton Aran | Worsted (#4) | 93 yds (85 m) / 50g | Soft matte finish, vast shade selection for crisp contrast. |
| Red Heart Super Saver | Worsted (#4) | 364 yds (333 m) / 198g | Durable acrylic option, sturdy holds form well after stuffing. |
⚠️ Note: Avoid using overly slippery yarns like silk or fuzzy yarns like chenille/bouclé for this project. Sharp corner definition and clear letter embroidery require smooth, tight-twist cotton or acrylic worsted yarns.
Gauge
| Measurement | Stitch Count | Details |
|---|---|---|
| 4 x 4 in (10 x 10 cm) | 20 sts x 22 rnds | In single crochet using 3.5 mm hook |
| Amigurumi Circle Check | Rnds 1–6 = 1.0 in (2.5 cm) across | Flat circular gauge check before body expansion |
Abbreviations
| Abbreviation | Definition |
|---|---|
| ch | Chain |
| sc | Single crochet |
| inc | Increase (2 sc in same stitch) |
| dec | Invisible decrease (sc2tog through front loops) |
| BLO | Back loop only |
| sl st | Slip stitch |
| st(s) | Stitch(es) |
| rnd(s) | Round(s) |
| MR | Magic Ring |
| [ ] | Repeat instructions inside brackets |
| ( ) | Total stitch count at end of round |
UK Conversion Note: US single crochet (sc) = UK double crochet (dc).
Special Stitches Explained
1. Magic Ring (MR)
Create a loop with your yarn, leaving a 4-inch tail. Insert your hook into the loop, yarn over, pull up a loop, yarn over, and pull through to secure the ring. Work the specified number of single crochets directly into the adjustable loop, then pull the tail tightly to close the center hole completely.
2. Invisible Decrease (dec)
Insert hook into the front loop only of the first stitch, then immediately insert hook into the front loop only of the next stitch (2 loops on hook plus working loop). Yarn over, pull through the two front loops, yarn over, and pull through both remaining loops on hook. This creates a seamless decrease that prevents stuffing from showing through.
3. Color Changing in the Round
When switching between Royal Blue (Yarn A) and Off-White (Yarn B) during the body section, complete the final yarn over of the stitch BEFORE the color change with the new yarn color. Carry the unworked yarn strand loosely along the back inside of the dreidel (floating), keeping tension even so the body doesn’t pucker.
Pattern Instructions
Pattern Notes
- Work in continuous spirals without joining rounds unless specified. Place a stitch marker in the first stitch of each round and move it up as you work.
- Use a hook size slightly smaller than the yarn weight recommends to create dense stitches that hold fiberfill firmly inside.
Section 1: Dreidel Body & Point
Top Handle Stem
Using Royal Blue (Yarn A) and 3.5 mm hook:
Rnd 1: Work 6 sc in a Magic Ring (6 sc)
Rnd 2: sc in each st around (6 sc)
Rnd 3: sc in each st around (6 sc)
Rnd 4: sc in each st around (6 sc)
Rnd 5: sc in each st around (6 sc)
Rnd 6: sc in each st around (6 sc)
Top Flat Shoulder Cap Expansion
Rnd 7: inc in each st around (12 sc)
Rnd 8: [1 sc, inc] x 6 (18 sc)
Rnd 9: [2 sc, inc] x 6 (24 sc)
Rnd 10: [3 sc, inc] x 6 (30 sc)
Rnd 11: [4 sc, inc] x 6 (36 sc)
Rnd 12: [5 sc, inc] x 6 (42 sc)
Rnd 13: [6 sc, inc] x 6 (48 sc)
✅ Checkpoint: Flat cap diameter should measure approximately 3.25 inches across.
Corner Shoulder Rim
Rnd 14: In BLO, sc in each st around (48 sc)
Side Body Walls (Framed Panels)
Note: In Rnds 15–24, you will carry Yarn A (Royal Blue) and Yarn B (Off-White). Work 2 sts in Yarn A at each corner, and 10 sts in Yarn B across each face panel.
Rnd 15: *With Yarn A work 2 sc, switch to Yarn B work 10 sc, switch to Yarn A;* repeat from * 3 more times *(48 sc)*
Rnd 16: Repeat Rnd 15 (48 sc)
Rnd 17: Repeat Rnd 15 (48 sc)
Rnd 18: Repeat Rnd 15 (48 sc)
Rnd 19: Repeat Rnd 15 (48 sc)
Rnd 20: Repeat Rnd 15 (48 sc)
Rnd 21: Repeat Rnd 15 (48 sc)
Rnd 22: Repeat Rnd 15 (48 sc)
Rnd 23: Repeat Rnd 15 (48 sc)
Rnd 24: Repeat Rnd 15 (48 sc)
Fasten off Yarn B (Off-White) leaving a 6-inch tail inside the body. Continue with Yarn A (Royal Blue) only.
Rnd 25 (Bottom Body Rim): With Yarn A, sc in each st around (48 sc)
💡 Designer Tip: Pause crocheting here to embroider the Hebrew letters onto the four Off-White faces while the piece is flat and easy to access!
Section 2: Gold Hebrew Letter Embroidery
Using Metallic Gold (Yarn C) and a sharp yarn needle, embroider one traditional letter onto each of the four Off-White side panels. Center each letter across the 10-stitch wide by 10-round high panel faces using surface backstitch or stem stitch.
       Shin (ש)                 Hei (ה)                Gimel (ג)                Nun (נ)
      █   █   █                ████████                 ████████                ████████
      █   █   █                █      █                        █                       █
      █████████                █      █                        █                       █
          █                    ████████                    █████                       █
          █                                                    █                       █
- Shin (ש): Embroider a horizontal bar across the bottom of the letter (spanning 6 sts). Stitch 3 vertical prongs extending upward 6 rounds high (one on the left, one in the middle, one on the right).
- Hei (ה): Embroider a top horizontal bar (6 sts wide). Stitch a right vertical leg (6 rounds tall) and a left vertical post that leaves a small open gap at the bottom corner.
- Gimel (ג): Embroider a top horizontal bar (5 sts wide) with a right vertical stem (6 rounds tall) and a small diagonal foot extending down and right at the bottom base.
- Nun (נ): Embroider a top horizontal bar (4 sts wide) extending down into a single long vertical right stroke (6 rounds tall) with a small flat base stroke extending left along the bottom.
Fasten off and secure yarn tails inside the body.
Section 3: Bottom Point Cone & Stuffing
Resume working with Yarn A (Royal Blue):
Rnd 26: In BLO, [6 sc, dec] x 6 (42 sc)
Rnd 27: [5 sc, dec] x 6 (36 sc)
Rnd 28: [4 sc, dec] x 6 (30 sc)
Rnd 29: [3 sc, dec] x 6 (24 sc)
✅ Checkpoint: Fill the upper handle stem firmly using the eraser end of a pencil or stuffed chopstick. Stuff the upper square body corners firmly, ensuring the top cap stays flat and square edges remain crisp.
Rnd 30: [2 sc, dec] x 6 (18 sc)
Add remaining fiberfill stuffing into the lower body cone. Stuff firmly so the dreidel maintains its geometric 3D shape, but do not overstuff to the point where stitches stretch open.
Rnd 31: [1 sc, dec] x 6 (12 sc)
Rnd 32: dec x 6 (6 sc)
Fasten off Yarn A, leaving an 8-inch (20 cm) tail.
Assembly & Finishing
- Thread the Yarn A tail onto a tapestry needle.
- Insert the needle through the front loop only of each of the final 6 stitches from the outside in.
- Pull the tail tightly to cinching the bottom point completely closed.
- Knot the thread securely at the base of the point, push the needle up into the center body, and pull the end out through a side seam.
- Snip the excess yarn tail so it retracts invisibly back inside the dreidel.
- Gently pinch along the four blue corner ridges and flat top edges with your fingers to square off the shape.
Size Customization Tips
- Mini Dreidel Ornament (3 in / 7.5 cm): Use Sport or Fine (#2/#3) cotton yarn with a 2.5 mm hook. Follow the pattern as written to create a miniature tree or garland ornament.
- Jumbo Plush Dreidel (10 in / 25 cm): Use Super Bulky (#6) plush chenille yarn with a 6.5 mm hook. Increase the body panel section (Rnds 15–24) by 4 additional rounds to keep the scale balanced.
Care Instructions
- Cleaning: Spot clean with a damp cloth, mild detergent, and cold water. Do not submerge completely to keep polyester stuffing evenly distributed inside.
- Drying: Air dry horizontally away from direct heat or prolonged sunlight.
- Reshaping: If the dreidel squishes during storage, gently press the flat panels inward and pinch the corner blue seams outward to restore its square shape.
FAQ
Can I substitute acrylic yarn for cotton yarn?
Yes! Acrylic yarn works wonderfully for amigurumi toys and holiday decor. Cotton yarn offers slightly sharper stitch definition for the sharp edges and corners, but worsted acrylic (like Red Heart Super Saver) will hold its stuffed form very well.
How do I make sure the dreidel stays square and doesn’t bulge into a ball?
The key lies in three techniques: first, working Rnd 14 and Rnd 26 in the Back Loop Only (BLO) forces the fabric to turn sharply at 90-degree angles. Second, carry your color changes cleanly at the 2 corner stitches. Third, when stuffing, pack fiberfill deliberately into the 8 corners first before filling the center.
Is this pattern safe for babies and toddlers?
Yes! Because the Hebrew letters are embroidered directly with metallic gold yarn and there are no plastic safety eyes or small removable parts, this stuffed dreidel is 100% soft and completely safe for young children to play with during Hanukkah.
Happy Crocheting!
You’ve completed your handmade plush Dreidel! Whether it’s sitting beside the menorah or spinning across the living room rug, it brings handmade warmth to holiday celebrations.
Be sure to save this pin to your Hanukkah Crochet Patterns board on Pinterest so you can find it easily every year, and leave a comment sharing your finished color choices!
📄 Your free PDF pattern
⏳ Preparing your free PDF… 30s
Like this one? Save it for later.