Reader Favorites
Autumn Harvest Crochet Table Runner Free Thanksgiving Pattern
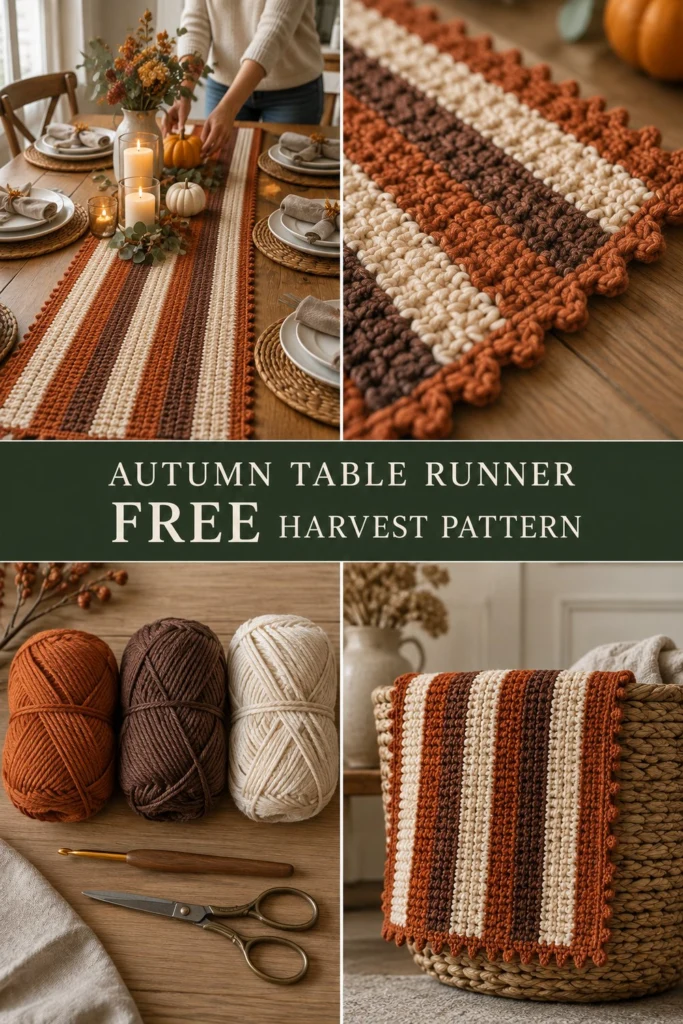
Bring warmth and seasonal charm to your holiday dining table with this handcrafted autumn table runner. Featuring rich pumpkin orange, deep chestnut brown, and creamy off-white stripes, this design combines tactile ribbed texture with a delicate picot border. Whether hosting Thanksgiving dinner or styling your sideboard for the fall season, this flat-lying, durable runner creates an inviting backdrop for candles and festive centerpieces.
Autumn Harvest Crochet Table Runner Free Thanksgiving Pattern
Quick Facts
- Skill level: Easy / Advanced Beginner
- Finished size: 13.75 in x 59 in (35 cm x 150 cm)
- Yarn: Worsted Weight / Medium (Category 4) 100% Cotton
- Hook: 5.0 mm (US H-8) crochet hook
- Stitches used: Chain (ch), Single Crochet (sc), Half Double Crochet (hdc), Slip Stitch (sl st), HDC in Third Loop
- Time to make: 8–10 hours
Size customization tips and calculation formulas are included further down in this guide.
What Makes This Autumn Harvest Runner Special
- Level, Flat Texture: Worked in back-and-forth half double crochet third-loop ribbed rows, this runner creates a dense, plush surface that lays completely flat under dinner plates, serving dishes, and candle holders without wobbling.
- Classic Harvest Palette: Alternating rich pumpkin, warm chestnut, and soft cream stripes reflect the natural colors of fall, seamlessly blending with rustic wooden tables and warm home decor.
- Picot Edge Finish: A subtle scalloped picot edging frame prevents the short edges from curling while adding a polished, artisan touch to both ends.
- Easy Maintenance: Crafted in 100% mercerized cotton, this table runner is heat-resistant for warm serving platters and fully machine-washable for post-feast cleanup.
Skill Level
This project is suitable for an Easy / Advanced Beginner crocheter.
– Working basic stitches in straight rows
– Changing colors cleanly at the end of a row
– Finding and working into the third loop of a half double crochet
– Working a simple decorative border around a rectangle
If you can make a standard chain and half double crochet, you can easily complete this rustic fall runner!
Finished Measurements
| Measurement | Inches | Centimeters |
|---|---|---|
| Width | 13.75 in | 35 cm |
| Length (excluding edging) | 59 in | 150 cm |
| Length (including edging) | 60 in | 152.5 cm |
Materials You Will Need
| Color Name | Yarn Weight / Type | Skeins Required | Yards | Meters |
|---|---|---|---|---|
| Pumpkin (Rust Orange) | Worsted / Medium (4), 100% Cotton | 3 skeins | 450 yds | 412 m |
| Chestnut (Dark Brown) | Worsted / Medium (4), 100% Cotton | 2 skeins | 230 yds | 210 m |
| Cream (Off-White) | Worsted / Medium (4), 100% Cotton | 2 skeins | 310 yds | 284 m |
Hook & Tools:
– Crochet Hook: 5.0 mm (US H-8) ergonomic hook (or size needed to obtain gauge)
– Notions: Tapestry needle, tape measure, sharp yarn scissors, 4 locking stitch markers
Yarn Suggestions
| Brand & Line | Fiber Content | Skein Details | Notes |
|---|---|---|---|
| Lion Brand 24/7 Cotton | 100% Mercerized Cotton | 186 yds (170 m) / 3.5 oz (100g) | Crisp stitch definition, smooth sheen, highly durable. |
| Lily Sugar ‘n Cream | 100% USA Cotton | 120 yds (109 m) / 2.5 oz (70.9g) | Matte rustic texture, widely available in fall tones. |
| Paintbox Yarns Cotton Aran | 100% Cotton | 93 yds (85 m) / 1.75 oz (50g) | Soft hand-feel with vibrant color saturation. |
⚠️ Note: Avoid using 100% acrylic yarns for dining table runners. Acrylic yarn can melt or warp when hot serving dishes are placed directly onto it and tends to stretch out of shape over long tables.
Gauge
14 hdc x 11 rows = 4 in x 4 in (10 cm x 10 cm) worked in HDC third loop ribbing using a 5.0 mm hook.
| Stitch / Row Count | Measurement (Inches) | Measurement (CM) |
|---|---|---|
| 14 stitches | 4.0 in | 10.0 cm |
| 11 rows | 4.0 in | 10.0 cm |
Abbreviations
| Abbreviation | Full Name (US Terms) |
|---|---|
| ch | Chain |
| hdc | Half Double Crochet |
| sc | Single Crochet |
| sl st | Slip Stitch |
| st / sts | Stitch / Stitches |
| 3rd loop | Third loop of hdc (horizontal bar behind top V) |
| RS | Right Side |
| WS | Wrong Side |
| rep | Repeat |
UK Conversion: sc = dc (double crochet), hdc = htr (half treble crochet), dc = tr (treble crochet).
Special Stitches Explained
1. Half Double Crochet in the Third Loop (Camel Stitch Ribbing)
To create the raised horizontal ridges visible across the stripes:
1. Yarn over, insert your hook into the third loop located directly behind and slightly below the standard top two loops (“V”) of the half double crochet stitch from the row below.
2. Yarn over and pull up a loop (3 loops on hook).
3. Yarn over and pull through all 3 loops on hook.
2. Picot Stitch (3-Chain Picot)
- Chain 3.
- Insert hook into the 3rd chain from your hook (or the base of the chain).
- Slip stitch to join, completing the picot bump.
Pattern Instructions
Pattern Notes
- The main body of the table runner is worked flat in long horizontal rows from end to end (lengthwise) to achieve seamless, straight color stripes.
- Turning chains (
ch 2at start of HDC rows) do not count as a stitch throughout the pattern. - To switch colors cleanly, execute the final yarn-over of the last hdc of a row with the new color, then chain 2 and turn.
Section 1: Runner Body
Foundation Chain: Using Pumpkin yarn, chain 210.
Row 1 (RS): Hdc in 3rd ch from hook (skipped 2 ch do not count as a st) and in each ch across, turn. (208 hdc)
Row 2 (WS): Ch 2 (does not count as st here and throughout), hdc in 3rd loop of each st across, turn. (208 hdc)
Rows 3–4: Rep Row 2 in Pumpkin. At the end of Row 4, change to Chestnut on the last yarn-over, turn. (208 hdc)
Rows 5–7: Rep Row 2 in Chestnut (3 rows). At the end of Row 7, change to Cream on the last yarn-over, turn. (208 hdc)
Rows 8–11: Rep Row 2 in Cream (4 rows). At the end of Row 11, change to Pumpkin on the last yarn-over, turn. (208 hdc)
Rows 12–15: Rep Row 2 in Pumpkin (4 rows). At the end of Row 15, change to Chestnut on the last yarn-over, turn. (208 hdc)
Rows 16–18: Rep Row 2 in Chestnut (3 rows). At the end of Row 18, change to Cream on the last yarn-over, turn. (208 hdc)
Rows 19–22: Rep Row 2 in Cream (4 rows). At the end of Row 22, change to Pumpkin on the last yarn-over, turn. (208 hdc)
Rows 23–26: Rep Row 2 in Pumpkin (4 rows). At the end of Row 26, change to Chestnut on the last yarn-over, turn. (208 hdc)
Rows 27–29: Rep Row 2 in Chestnut (3 rows). At the end of Row 29, change to Cream on the last yarn-over, turn. (208 hdc)
Rows 30–33: Rep Row 2 in Cream (4 rows). At the end of Row 33, change to Pumpkin on the last yarn-over, turn. (208 hdc)
Rows 34–37: Rep Row 2 in Pumpkin (4 rows). Do not fasten off at the end of Row 37. (208 hdc)
✅ Checkpoint: Measure your panel flat. The piece should measure approximately 13.75 inches (35 cm) wide by 59 inches (150 cm) long. You should have 10 distinct color stripes (4 Pumpkin, 3 Chestnut, 3 Cream blocks).
Section 2: Border & Edging
Work the edging around the full outer perimeter using Pumpkin yarn.
Round 1 (Edging Base):
1. Top Long Edge: Ch 1, sc in each of the 208 sts across the top edge.
2. Corner 1: (sc, ch 2, sc) in the corner space.
3. First Short Edge: Work 37 sc evenly down the short side (1 sc into each row-end).
4. Corner 2: (sc, ch 2, sc) in the corner space.
5. Bottom Long Edge: Work 208 sc along the bottom of the foundation chain.
6. Corner 3: (sc, ch 2, sc) in the corner space.
7. Second Short Edge: Work 37 sc evenly up the short side (1 sc into each row-end).
8. Corner 4: (sc, ch 2, sc) in the corner space.
9. Sl st to first sc to join. (498 sc, 4 corner ch-2 spaces)
Round 2 (Picot Border):
1. Corner: Sl st into corner ch-2 space, (sc, picot, sc) in corner ch-2 space.
2. Long Edge: [sc in next 3 sts, picot] rep 69 times, sc in last st along side.
3. Corner: (sc, picot, sc) in corner ch-2 space.
4. Short Edge: [sc in next 3 sts, picot] rep 12 times, sc in last st along side.
5. Corner: (sc, picot, sc) in corner ch-2 space.
6. Long Edge: [sc in next 3 sts, picot] rep 69 times, sc in last st along side.
7. Corner: (sc, picot, sc) in corner ch-2 space.
8. Short Edge: [sc in next 3 sts, picot] rep 12 times, sc in last st along side.
9. Sl st to first sc of round to join. Fasten off Pumpkin yarn. (166 picots total)
✅ Checkpoint: Check that the picot points lie flat and crisp along all four sides without pulling or gathering the body fabric.
Section 3: Assembly & Finishing
- Weaving Tails: Using a yarn needle, weave all color-change yarn tails securely into the corresponding color stripes on the wrong side of the fabric (weave back and forth through at least 1.5 inches of stitches).
- Blocking:
- Steam block or spray wet block the finished table runner flat on blocking mats.
- Pin out the four corners and flatten the picot loops along the border.
- Allow to dry completely before placing on your table.
Size Customization Tips
To adjust the table runner dimensions to fit your specific table length or width, use these simple gauge formulas:
- Length Customization:
- Formula: Every 3.5 stitches equals approximately 1 inch (2.5 cm) in length.
- To make a 72-inch (183 cm) runner: Chain 254 (252 sts + 2 turning ch).
- To make a 90-inch (228 cm) runner: Chain 317 (315 sts + 2 turning ch).
- Width Customization:
- Formula: Every 1 full 4-row stripe block adds approximately 1.45 inches (3.7 cm) to the width.
- Simply repeat the 3-color stripe sequence (Pumpkin, Chestnut, Cream) until reaching your desired width before working the top and bottom edge rows.
Care Instructions
- Machine Wash: Place runner in a mesh laundry bag and wash in cold water on a delicate cycle using mild detergent.
- Drying: Lay flat on a clean towel to dry. Re-shape the picot border with your fingers while damp.
- Ironing: Iron on cotton setting with steam to press out any stubborn creases after washing.
FAQ
Can I use acrylic yarn instead of cotton for this runner?
While acrylic yarn can be used, standard 100% cotton is strongly recommended. Cotton provides optimal heat resistance under hot serving dishes and creates crisp, defined ridges that keep the runner laying perfectly flat on wood surfaces.
How do I ensure my stripes have clean edges when changing yarn colors?
Change color on the final yarn-over of the last stitch in a row. Pull the new color through to complete the stitch, chain 2, turn, and begin the next row. Carry yarn ends along the edge or weave them in along their matching color stripe.
My edges are curling upward slightly. How can I fix this?
Ribbed half double crochet textures naturally tense up during crocheting. Wet blocking or steam ironing the finished piece under a damp pressing cloth will immediately relax the fibers and make the entire runner sit level.
Happy Crocheting!
Your Autumn Harvest Table Runner is ready to dress your Thanksgiving dinner table! Save this pattern pin on Pinterest for your seasonal craft planning, and share your finished color combinations in the comments below.
📄 Your free PDF pattern
⏳ Preparing your free PDF… 30s
Like this one? Save it for later.